9 November 2013
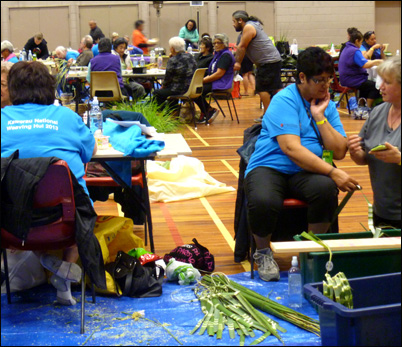
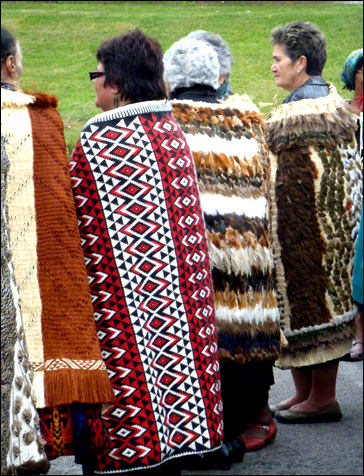 Te Roopu Raranga Whatu o Aotearoa, the Māori weavers’ association of New Zealand, hosted a national gathering, or hui, recently at Kawerau as part of their Biennial General Meeting. A number of participants wore woven cloaks to the customary welcome ceremony, or pōwhiri, which took place at the start of the gathering. Most of the cloaks shown here were woven in a traditional style, incorporating different coloured blocks or bands of feathers into the design. The striking red and black cloak was woven with the Tāniko method of twining coloured threads of flax fibre together in geometric patterns.
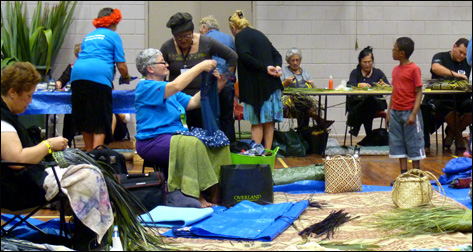 Approximately two hundred weavers from throughout New Zealand participated and, as this was the first national weaving gathering I’d been to, I was very interested to see all the diversity and originality of the work people were doing. Cloaks, different types of baskets, mats, hats, flowers, containers, skirts, bottle covers, tiny decorative kete, hair pieces and more were in the process of construction. No formal workshops were held at the gathering but weavers shared ideas and techniques and learned from each other.
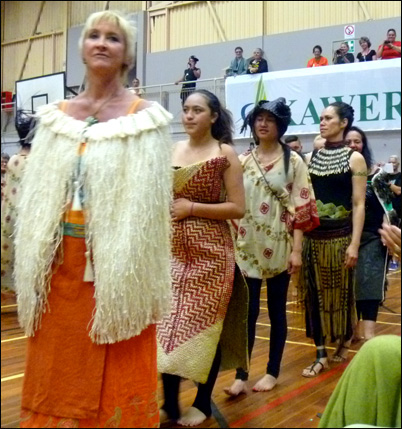 One of the highlights of the weekend was the Wearable Arts Fashion Show, which offered weavers an opportunity to showcase their own creations. Many of the people I talked to were formally studying Māori arts at tertiary institutions and a number were exhibiting in the show alongside more experienced weavers.
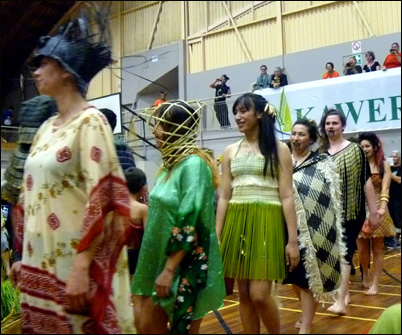 The students, ranging across all ages, wove some innovative entries, including several wacky hats, for the fashion show. One particularly unusual hat was woven right around the model’s head so it’s no wonder the show was a bit late starting!
Although most participants were using New Zealand flax, or harakeke, some weavers were using different materials such as corn husks, jute, cotton threads, raffia, fine wire and other plant materials.
 One group was using pīngao, a native golden sand sedge, which they had ready access to from the northern beaches near their home. (Pīngao is not readily available on southern beaches). In particular, adding feathers into garments, from birds such as rooster, pukeko and pheasant, was a popular theme. The sources of feathers include plucking feathers from road-kill birds, collecting feathers from bird-keepers, buying exotic feathers online, or buying them in packets from local craft suppliers.
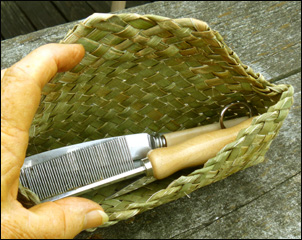 The host group supplied flax for visitors and I used this to weave a small basket to hold the weaving tools I’d taken but didn’t have a container for. I made the basket with 36 strips of flax .75 cm wide, and gave it four corners to provide enough space for the tools.
 The flap tucks in to keep the tools in place, and is flexible enough to fold out so that the tools can be removed. At 20 cm long by 5 cm wide, it’s compact enough to fit into a small space in airline luggage.
The 2015 gathering will be held in Ahipara in the far north of New Zealand. For information contact Toi Māori Aotearoa.
© Ali Brown 2013.
Scroll down to leave a new comment or view recent comments.
Also, check out earlier comments received on this blog post when it was hosted on my original website.
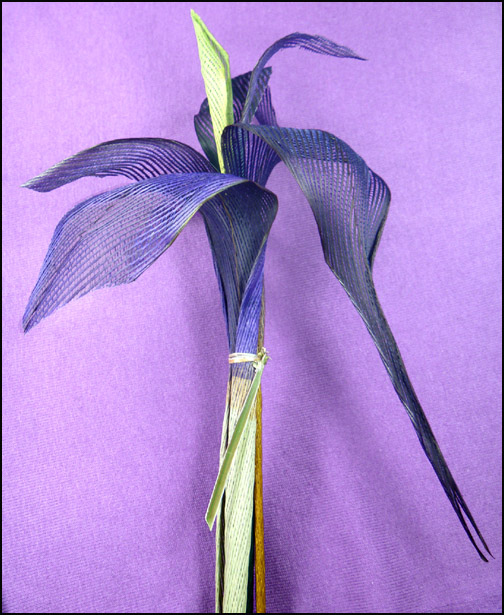 While preparing a third edition of my book, Weaving Flowers from New Zealand Flax, I experimented with making flowers from netted flax, and the new edition now includes several netted-flax designs. Making netted flax with a pasta machine was discovered by Christall Rata and she gained a patent #336288 in 10 Jun 2002. Sema Morris from Artiflax later acquired patent and it lapsed on 15 Sep 2013, expiring on 15 Sep 2020. A variety of differently processed netted leaves and bouquets including netted flax are for sale from
 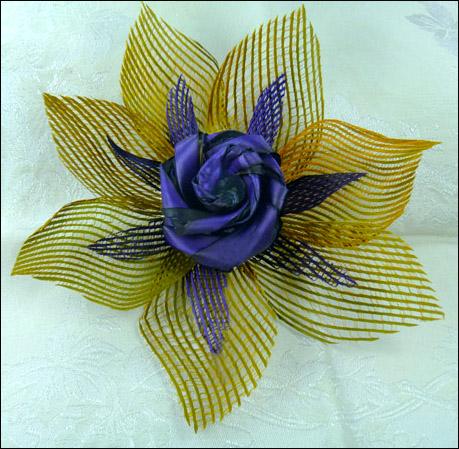 It’s fun experimenting with netted flax because it can be manipulated in a wide variety of ways to make a range of delicate flowers which are quite different from flowers woven with un-netted flax. The Iris, Daisy and Tulips pictured here are all made from dyed netted flax. The Iris is simple to make and takes just a matter of minutes once the flax has been dyed, and the result is almost instantaneously rewarding. There are several different ways that the Iris can be shaped, and there are also different ways that the Daisy can be made. The version shown here combines a flower woven from un-netted flax — which I call a Tropical Rose in my book — with netted flax, which changes the look of the Tropical Rose completely. The Daisy can also be made without an un-netted flax flower in its centre, and more layers of netted petals can be added, opening up creative possibilities.
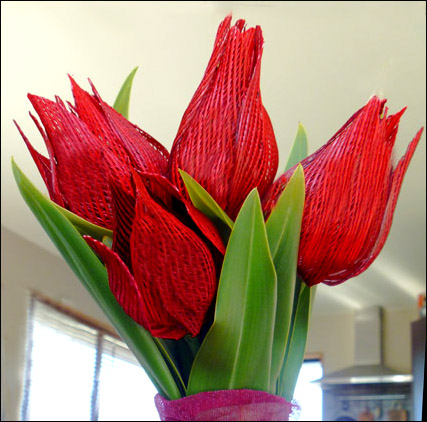 The Tulip is more structured and takes more time to make but I think the results are worth the effort. As well as including instructions for weaving netted-flax flower designs, the third edition of Weaving Flowers from New Zealand Flax includes a new section on flower arrangements for weddings and events. The book is now printed double sided on 100 gram paper, which is more robust. All the information about buying the book directly from me is on the
 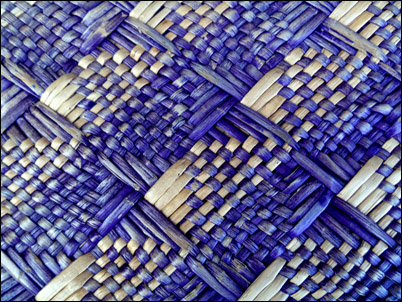 This eye-catching pattern belongs to a well-worn basket (kete whakairo) that a participant brought to a two-day weaving workshop at Waikawa marae (raranga wananga noho marae), which I was invited to tutor at recently. What particularly struck me is its vivid three-dimensional effect, which is hard to fully appreciate unless the kete is seen in the flesh, so to speak. I also like the way the pattern can be seen as either a checkerboard of vertical squares or as a checkerboard of diagonal squares. It’s woven in blocks of one-under, one-over (takitahi), interspersed with blocks of strips woven in longer weaves. The tightly woven blocks keep the weaving very even and the old kete still has a good shape. If you’d like to try it out, it’s pattern #76 in Mick Pendergrast’s book, Raranga Whaikaro.
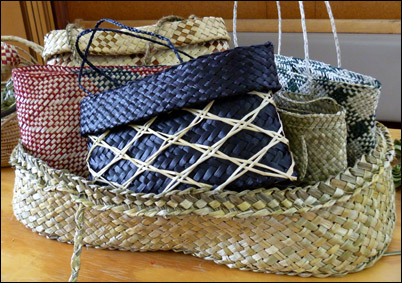 Marama, an experienced weaver, brought along some of the kete whakairo she has woven recently, as well as a baby pod (not for carrying) (wahakura). She mentioned that there were a couple of things she would do differently next time she wove a wahakura. Firstly, this carrier wasn’t quite wide enough for a baby, so to make it wider she would add more strips into each starting plait. The other tip she gave is to use a really strong flax for the wahakura as ordinary flax isn’t strong enough to give structure to the sides and hold them upright. For more weaving tips check out Rita Baker’s YouTube videos
 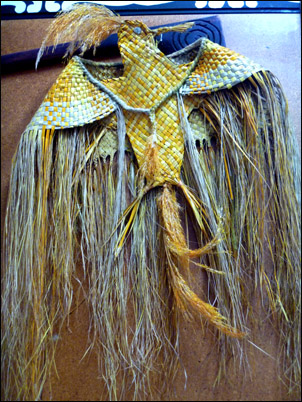 A striking and well-made sculptural piece brought along by Helen was the result of weaving a corner in a different way. Helen had started to weave a kete but instead of crossing two strips to start the corner, she took them out to each side. This inspired her to weave the bird instead and the outwards turn became the start of wings. Using a combination of her sculptural and weaving skills, Helen ended up with this magnificent bird (kahu). It wasn’t what she started out to weave but it turned out to be a unique piece of weaving.
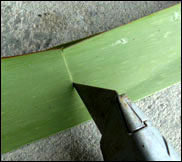 Several weavers decided to make ketes using the whitebait (Koeaea) pattern which requires a plaited base to set the pattern (whakapapa). As I watched one of the weavers, Helen, preparing her strips, I noticed she used an extra step to prepare the fibre (muka) ends that I hadn’t encountered before. She made a cut half way through the thickness of the leaf where the fibre end would usually start in the traditional method of
 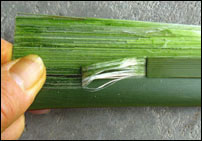 She then folded the shiny side of the strip down, at the cut, onto the shiny side of the leaf, held the strip very tightly at this point and pulled the strip down sharply as usual. The cut helped to release the muka from the outer green of the leaf although some fibre ends may still need some scraping to remove any excess green outer leaf that remains.
 During the weekend, people wove flowers (putiputi) using my book as a guide, large containers (waikawa), small baskets (kono), including those with flaps, baskets with plaited tops, a three-cornered basket, wristbands, balls and rope. The young boys (tamariki tane) learned to plait for the first time and made a plaited rope (whiri kawe) with shredded flax. At the other end of the scale, Peter, an experienced stone carver, was making a fine rounded four plait rope (topuku) to use for carrying fine stone vessels.
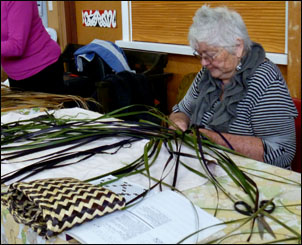 I thoroughly enjoyed my weekend with the people of Waikawa marae. Their hospitality was welcoming and their enthusiasm for weaving was exciting. It was a large group with weavers of varying abilities which brought a vitality to the group and a buzz of conversation as people helped each other. Waikawa marae plans to have another raranga wananga in 2013 and to continue with regular weaving sessions.
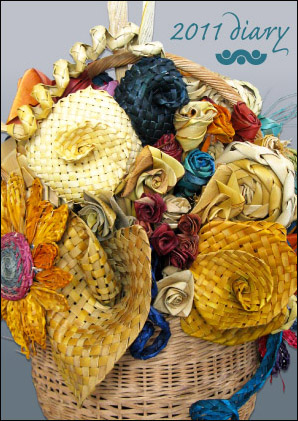 Creative Fibre — once known as the New Zealand Spinning, Weaving & Woolcrafts Society — seems to be evolving from a focus on traditional woven woolcrafts to encompass flax, felt, free-form designs and any and every use of fibre for creative purposes. Last year’s Creative Fibre diary featured a basket of my flax flowers on its cover and this year I was invited to give two demonstrations of flax basket-weaving at the Creative Fibre Festival in Marlborough. It was my first visit to a Creative Fibre Festival, and the whole festival gave off a feeling of creative energy. As I listened to the presenters, I automatically thought of the way the ideas they applied to other fibres could be transferred to the process of flax weaving.
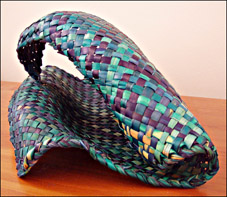 The materials themselves can dictate the way the project ends up and — if one goes with the flow — the results can be innovative and dramatic. I find myself regularly using this technique when I’m designing though I generally call it playing. A good example of this is the flaxwork Wave pictured above, which I created for an exhibition in the seaside town of Lyttelton. It’s made from a flat woven square of multi-coloured blue flax strips, and although I wasn’t at all sure how it was going to end up, it does seem to capture a sense of the shape and motion of a wave.
 The garment should look good close up and at a distance as the garments are closely scrutinised by the judges, but it also needs to have impact when are worn during the show. Often the winner is a very simple idea. It’s also helpful for the garment to have a catchy name. Deb Price, whose woven flax pots are pictured here, and who often works with Sarah on entries, was the Montana Supreme Award Winner in 1995 with an twined-flax creation, Moko.
 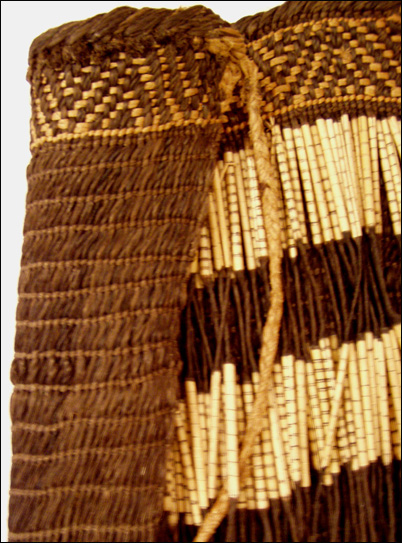 Flax featured in Heather Baskiville-Robinson’s presentation on making paper. Heather took us through the process of making flax paper, and we watched Canadian paper-maker Helen Heibert’s time-lapse DVD on the way that some materials can be their own creators as they change shape over time, a property that Helen specifically exploits in her creations. This has a parallel in flax weaving where two properties of flax have been exploited to make a skirt, or puipui. Firstly, flax strips curl up into cylinders when they dry, a property which is used in puipui-making to make the long rustling skirt of the puipui. Secondly, the fibres inside the flax take a dye more readily than the leaf itself and this property is exploited to make the geometrical patterns on the garments.
 Flax is an ideal material to be creative with, as it is pliable and sculptural while green but hardens to retain shape as it dries. It also has a strong fibre and it dyes well. Traditional weaving techniques can be used to make something a bit out of the ordinary, like my little three-cornered Wind-blown kete.
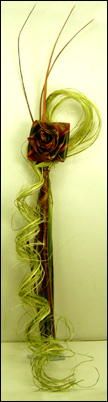 Flax leaves are a popular and versatile addition to floral arrangements, irrespective of whether the flowers are picked from the garden or are woven from flax itself. Modern hybrid flaxes come in a variety of different colourings and are often used by florists in commercial floral displays. Flax can be dried into long thin rods and used to give height to a display, it can be
 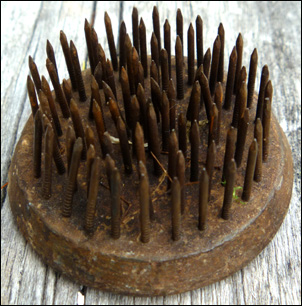 It’s ideal for this purpose as one end is the hard base of the leaf, which makes a strong stem. It’s also a way of using up pieces of flax that are usually seen as waste. Shred the flax with a strong dog comb or one of those spikey florist’s bases that is used in the bottom of vases to hold stalks in place.
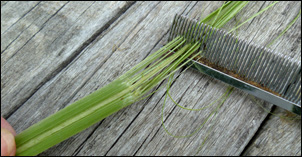 Take the mid-rib piece and shred the flax from where the flax joins together down to the tip of the flax. Run the comb along the flax piece several times until it is evenly and reasonably finely shredded. This can be added to an arrangement as it is, or it can be dyed to give some colour and movement to an arrangement, as illustrated in the flax flower arrangement here, where the shredded flax flows gently down from the flowers, adding a softness to the hard edges of the pot.
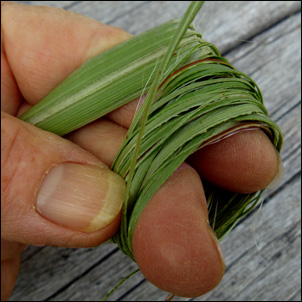
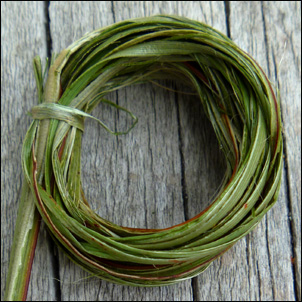 Another way of using shredded flax is as a tight circlet or as softer flowing curls, as illustrated in the bouquet at the top of this post. To make the tight circlet, smooth the shreds together so they become a smooth rope and then wrap them around your fingers so they make a ring.
 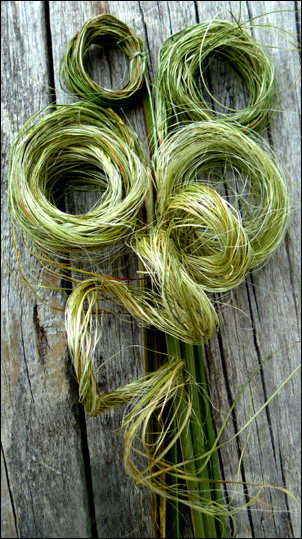 Keep wrapping until all of the flax rope is wrapped into the ring. Tie the ring of flax in place around the stem with a fine piece of flax to make a circlet or circlets for a display, or hold the wrapped circle in place with the tie or a peg until it dries. Once dried, undo the ties and gently tease the curls out until they fall in soft ringlets or waves. The curls are attractive when the shreds are left together in bunches and are just as attractive when separated out for a finer effect.
 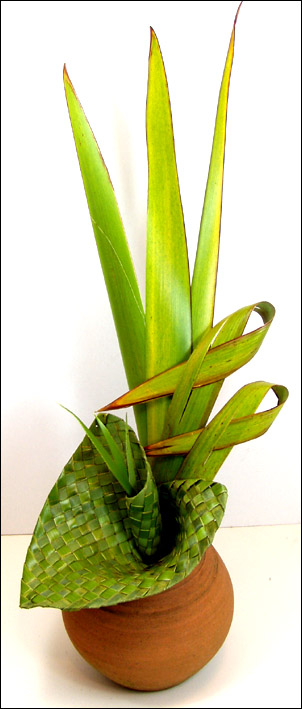 Florists often use the coloured variegated flax for foliage but green flax can be just as decorative. If it is featured as a straight leaf, it can give a strong structural quality to a display. By contrast, if it is curled around, it can give a soft, voluptuous quality.
 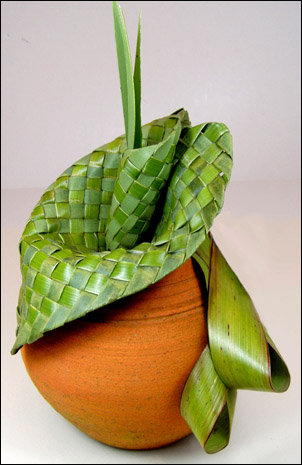 Because of its structural qualities, flax foliage is particularly popular in Ikebana arrangements but it suits all kinds of displays and is used all over the world in floral displays. There are many ways flax can be used in floral arrangements, and some additional ideas on using flax as foliage can be found in my
 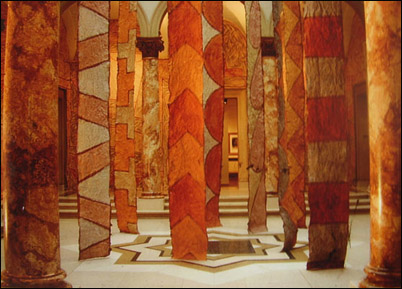 I recently took part in my second paper-making workshop with
 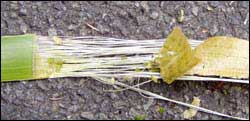 As flax weavers know, flax has tough fibres and a very high fibre content. Indeed, some of the traditional forms of Māori weaving involve stripping flax right down to the pure fibre. For paper making, it is the high fibre content that makes flax a particularly suitable raw material.
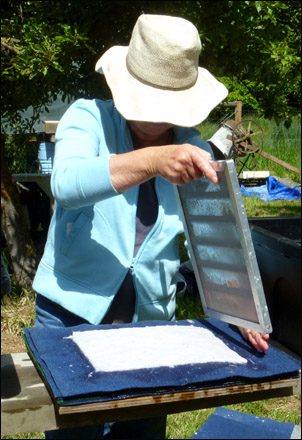 For the technically-minded, when paper is made with any sort of plant fibre, the fibres lock together in a process called hydrogen bonding. Plants rely on cellulose for the strength in their branches and leaves, and paper is essentially a network of cellulose fibres held together by these hydrogen bonds.
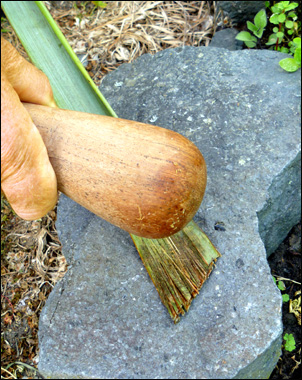 To reduce the flax into small pieces, Mark bashes the flax leaves with a piece of wood to begin to split them apart and soften them (which is quicker than stripping them right down to the fibre). He then cuts the leaves crosswise with a craft knife, leaving pieces about 5 mm long. Another option can be found in Making paper in New Zealand, a book by May Davis, which contains clear, easy-to-follow instructions for making flax paper. May does not bash the flax and suggests removing the hard midrib of the flax leaf and cutting the leaves into 1 cm pieces with scissors. The extra step in making paper with flax involves using a solution of caustic soda in a stainless steel pot. (If the pot is aluminium, it will be eaten away by the caustic soda and will give off flammable hydrogen gas.) You can buy solid caustic soda from a hardware store or supermarket.
 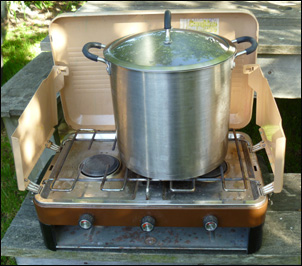 Place the flax pieces in an empty stainless steel pot, and then add enough caustic soda solution to cover them. Boil the pieces about 40 minutes to an hour until they change colour. Alternatively, you can soak the pieces for a few days without boiling. Rinse the caustic soda from the pulp in a sieve under cold running water. From here on, you can follow standard
 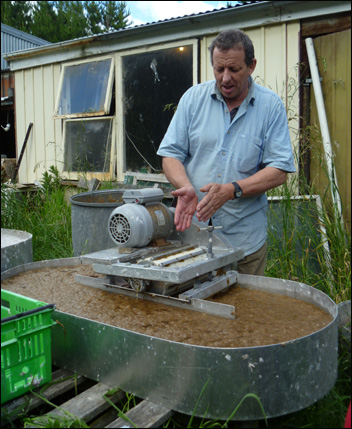 For those who want to make paper in bulk, Mark has developed and manufactures the Hollander beater shown here, which he sells and exports at a fraction of the cost of other manufacturers of Hollanders. The Hollander takes the place of a blender and pulps the fibres rather than slicing them, which results in a higher quality paper-making pulp.
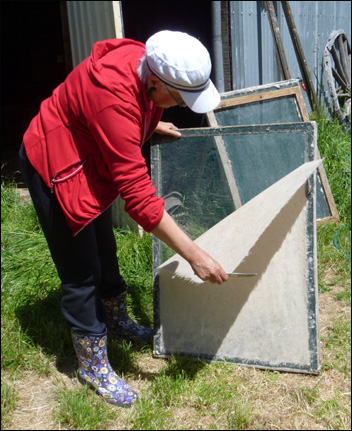 In the workshop, we made large sheets of flax paper and left them in the sun to dry completely before peeling them off the frame. The other workshop participants were artists making paper to paint on. For my part, I’m not sure what I’ll use the paper for and am still awaiting inspiration. Mainly, I participated in the workshops to learn more about another use for flax, and found Mark’s workshops enjoyable as well as informative. Mark now has a studio and gallery in Amberley where you can learn how to make paper.
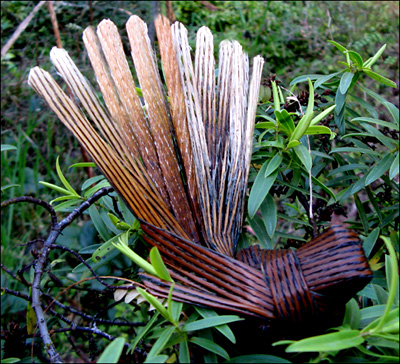 This woven flax fantail — or Piwakawaka, a native bird of New Zealand — is an adaptation of a common woven bird design, and I’ve placed the instructions for weaving it on a separate web page,
 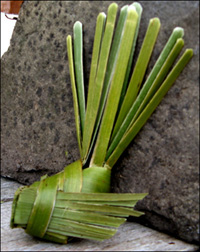 Once the final touches of cutting the wings and tail feathers are completed, there’ll be a cheeky, flighty, little fantail for you to enjoy. For the fantail shown above I dyed the flax to match the fantail’s own colours and netted the flax to give it a feathery look, although the fantail is still cute if it is woven without dyed or netted flax. However, if you do want to use netted flax, Weaving a flax fantail includes instructions for netting flax, and some notes on weaving the fantail with netted, dyed flax.
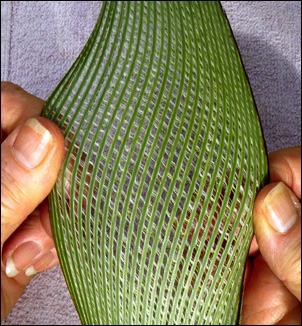 Making netted flax with a pasta machine was discovered by
 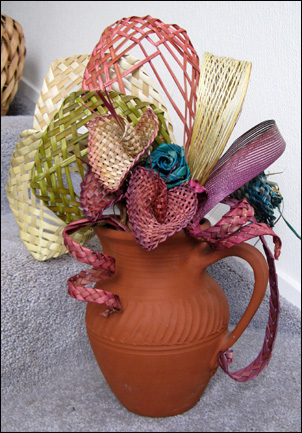 Participants in my flax weaving workshops have often asked me about netting flax, and a couple of commenters on my blog have also enquired about it. Netted flax is very attractive and is particularly popular for foliage in flower arrangements and bouquets. It also seemed ideal as a way of matching the feathers of a fantail.
 Two days after the earthquake, as I drove around the Sumner estuary, I noticed shags drying their wings as they always do on a rocky outcrop, and later — when I was staying with one of my sons in a rural cottage — a pair of fantails flitted and flirted around the place, bringing a sense of joy and peace. Seeing these birds living life normally and happily inspired me back into creativity and the flax fantail is the result. Thank you to all those people throughout New Zealand who sent aroha and good wishes, and offered accommodation and holidays after the earthquake. Your thoughts were very welcome and much appreciated.
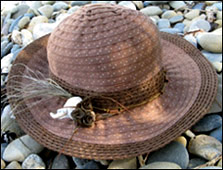 Summer is the time for holidays, beachcombing, sun hats and plenty of free space for creativity. For me, it’s a time for putting into practice some of the weaving ideas I’ve had during the year and haven’t tried out, as well as a time for just playing around with weaving.
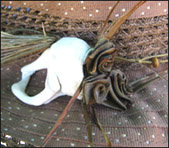 Hats are fun to decorate, and shells add a summery, seaside look to a hat. I found this broken shell on the beach at Ruby Bay, filled it with little flax flowers and attached it to the hat band. The natural bronze colour of the flax I used, which was growing by my camp site, happened to match the brown colour of the hat, although the colour will fade in time.
 Adding natural objects to the rim of a bowl can create an interesting look. I found this smooth, twisted root on the beach and it was supple enough to wind around the top of a woven bowl. The top of the bowl was finished in a French plait, which leaves the ends of the plait straggling around the top on both the inside and outside of the bowl.
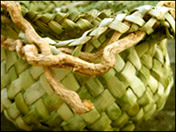 These ends are normally cut off. In this case, I cut off the outside ends and wove selected groups of four inside ends into
 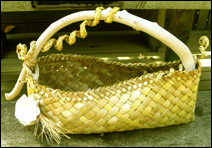 I rather like smooth, curved driftwood pieces as handles for baskets. In the piece illustrated here, I wedged one end of the driftwood into the weaving to keep the handle upright and tied it on with fine plaits by drilling a small hole through each end of the handle and threading the plaits through the holes and then tying them though the weaving. I’ve made a number of these three cornered baskets, or waka kete, and added shells or
 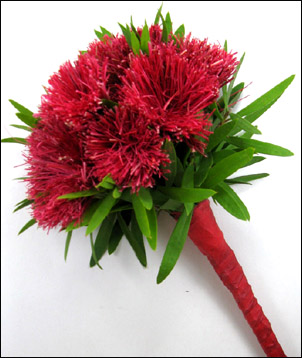 I have just released the second edition of my book,
  A bright, decorative look suitable for Christmas can be given to any piece of weaving by adding coloured strips of flax over the top of the existing weaving to make striking patterns. In the example on the left, I created a pattern by adding red flax strips on the top of a piece of undyed weaving. The good thing about this sort of patterning is that it can be removed later and the weaving will return to its original state. To overlay the pattern, I cut strips of red-dyed flax into lengths that were five times as long as the width of the strips used in the original weaving. I then inserted a length under one strip, over three strips and then under the next strip, on a diagonal, to create the first piece of the pattern. The next length was woven alongside this in the same way, to create the next piece of the pattern. For the dots, I inserted a shorter length of red flax over just one strip. The red strips were dry when I used them, although it may be easier to dampen the dyed flax before use. Be careful if you do moisten the dyed flax as the colour of the dye may come out onto the dried flax if the dyed flax is too wet. This red-coloured patterning would also look good against fresh green flax.
 This way of putting patterns into weaving is quite different from the traditional way patterns are woven in flax weaving. In the traditional way, the dyed strips are woven into the main body of the weaving, and the pattern is made by the way the strips are woven together. In patterned flax baskets, or kete whakairo, the plan for the pattern, or whakapapa, is set at the beginning of the weaving when the dyed strips are included into a plait at the bottom of the basket. This way of incorporating patterns into the weaving is an advanced weaving technique, and examples of kete whakairo can be found in museums around the world. I wove the black and white kete pictured above using a pattern from Mick Pendergrast’s book Raranga Whakairo listed on the
 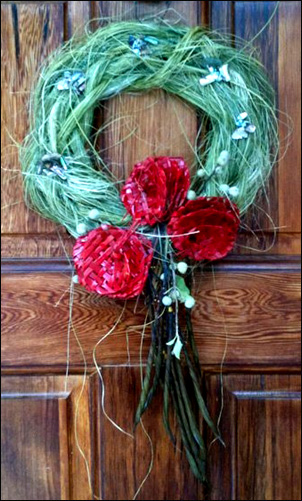 On another Christmas note, Phil — a customer who bought my book — sent me this photo of his wife Anne’s wreath, which is made from shredded flax and paua shell, and has three red woven flax flowers attached to the bottom of the wreath. I do like the way Anne has created the wreath, with a randomness in the use of the flax shreds but also structure in the shape, resulting a very attractive and original Christmas wreath. The New Zealand theme is further enhanced by the addition of pieces of paua shell attached randomly around the wreath. Instructions for making the woven flax flower that Anne has attached at the bottom of the wreath can be found
 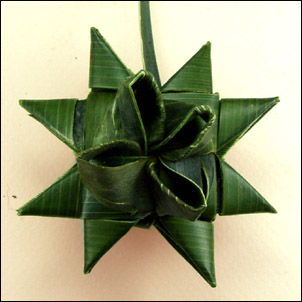 While internet searching I found another interesting woven wreath, which is based on the three-dimensional star shown on the right. The wreath is made by shaping a number of these stars together in a circle. I haven’t been able to contact the owner of the photo of the wreath, Elmer, for permission to use it in my blog, but you can see the wreath
  “What can I use this hard butt end of the flax leaf for? It seems such a waste to cut it up for compost.” This question is one that is regularly asked in my workshops and one that I keep in mind myself. The butt end of the leaf, where it grows from the base of the plant, is very strong and can be shaped into handles for little baskets like the ones pictured here. These handles have attractive markings, ranging from cream to brown to dusky pink, depending on the colour inside the flax leaf, and they are simple and easy to make. I keep a store of them on hand for those times when I’d like to put a handle on a basket but haven’t the time to plait one.
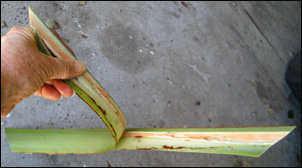 To make the handle, split the flax butt apart down the middle, separating the two parts of the leaf. If the butt end has been cut off the leaf, it may not be that easy to get started so use a knife or sharp object to separate the two sides of the butt apart. Once you’ve separated the sides, pull them completely apart. There may be a sticky gel inside the leaf, which is traditionally used as a skin-repair ointment or as a glue. You can wipe this off, but it will dry into a cellophane-like substance which is easy enough to pull off when it’s dry.
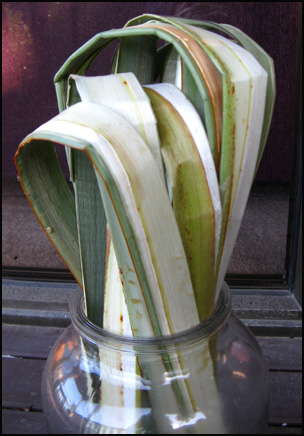 The next step is to bend the butt over and secure it in this shape while it dries. Before bending it over, scrape the side of the butt that will be the underneath side of the handle. This will help to soften the butt and make it easier to bend. You can bend the butt either way but some of the harder, thicker butts may bend easier one way than the other. Try to bend the butt smoothly so that it doesn’t get sharp folds, as the one on the right has in the photo here. These folds are impossible to smooth out once the flax is creased. Put the bent butts inside a container that will hold them in shape, like the wide-mouthed jar I’ve used here, and leave to dry, or tape them into shape.
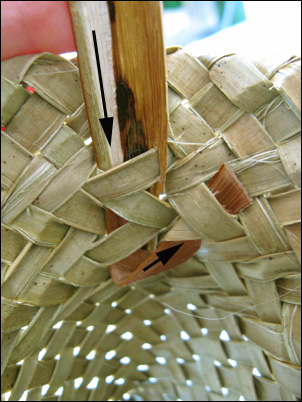 Once you’ve cut the butt to the correct length, trim the ends into a point and then push each one down through the weaving on each side of the basket, until a short end is sticking out from the weaving. Bend each end up and insert the end of the point underneath the closest strips to secure it. Pull the handle up gently so that the handle fits snugly in the weaving. This will secure the handle in place and make sure it doesn’t pull out as the flax dries. Alternatively, split the pointed ends of the handle into two and on each end bend one point up one side and one point up the other side to secure the handle.
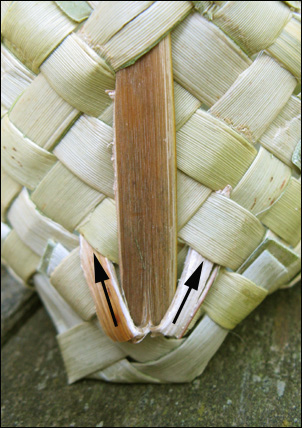 This can either be done on the inside of the basket, as in the photo above, or the outside of the basket as in the photo to the left — if it’s on the outside it can be a decorative feature. If the handle is very dry, it may be necessary to moisten the end before you bend it up, otherwise it may split.
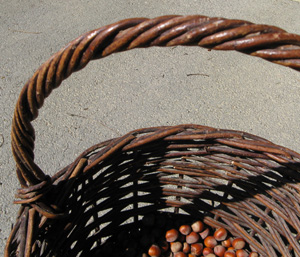 Using a hard but pliable material for a handle is a common way to make a handle in basket-making, although often the core material is covered with another material, like the handle on the willow basket pictured here. In this basket, the core is made from a thin bent willow branch, and this has been covered by winding finer willow branches around this core.