On this page
Weaving the fantail
Netted flax
Using dyed, netted flax for the fantail
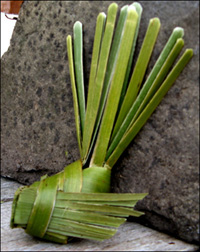
 Weaving a flax fantail, piwakawaka, is reasonably straightforward although it requires more care and attention to follow the instructions than weaving a flax flower. The fantail shown here has been woven from netted, dyed flax, but it still looks good woven from fresh flax. I suggest that you weave the bird with fresh flax first so that you get an idea of the weaving process before you try weaving one with netted flax, which is more delicate to work with.
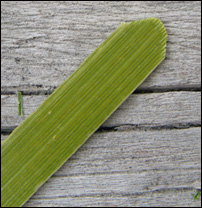
 Later on this page there are instructions on weaving the fantail with netted, dyed flax. However, for the sake of simplicity, these instructions show a fantail woven from fresh, undyed flax. To make this fantail, you’ll need four strips of flax. Measure about sixty centimetres down from the tip of the flax leaf and cut it to this length. At the cut end, split the leaf into four strips that are two centimetres wide. These strips will taper down to a point at the other end.
 The fantail can be made with just two strips, but four strips give the weaving more body and structure, and more flax to make the tail with. Before starting to weave, soften the flax strips by running the blunt edge of a knife along the underside of the flax several times. Put two of the strips together so that the shiny side of the strip that is underneath is against the dull side of the top strip.
 Repeat this with the other two strips so that you now have two sets of two strips. Each set of two strips will be worked together as if they were one strip. If you find it hard to keep the strips together, each set can be held together with some tape at one end. However, you may find that the tape needs to be removed as you get further on into making the bird.
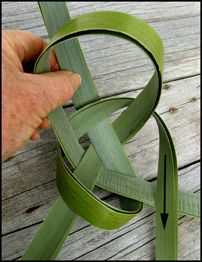
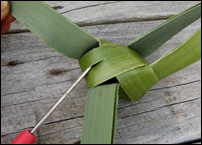
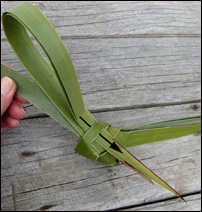
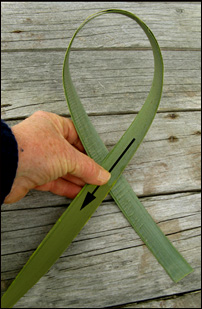 Take one of the sets. Using it as one strip, make a loop. To do this, hold the cut end of the strip down to the right with the shiny side down and take the strip up to the left, loop it around and bring it back down to the left. Take it over the top of the starting end of the strip and hold it in place. It’s important that the cut and pointed ends are in these positions when you come to make the tail and wings.
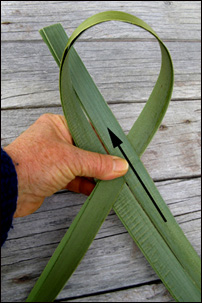 Take the second set and using it as one strip with the shiny side down, poke the cut end of the strip through the loop. Lay it alongside the first strip with just a short length poking through the loop and hold it in place. There needs to be plenty of length in the pointed end for the next step in the weaving.
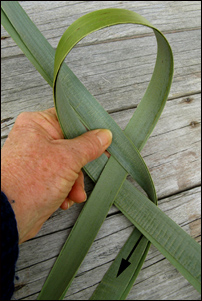 Take this pointed end and bend it underneath the cut end of the first strip. Move it around and out to the left, and hold it in place. Keep the dull, underside of the flax showing as you do this. The flax is not folded at any stage in this process, but is curved rather than folded.
 Bring this strip over the first strip and back around to the left and hold in place. Make sure the strip is lying outside of the loop and the dull side of the strip is showing.
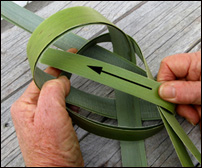
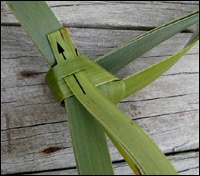
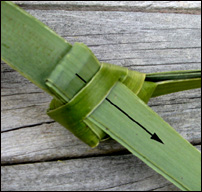
 Now turn this strip to the right and take it behind the loop and across the top end of the first strip. Hold it in place. Make sure the flax is bent rather than folded around and that the dull side is still showing.
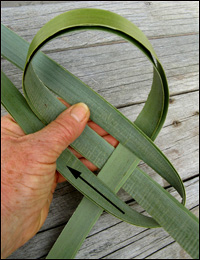
 Bring the strip back down towards you and take it over the first strip at the base, making sure the dull side stays on the inside of the loop that is made around the strips poking out to the left.
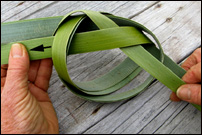
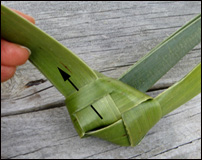
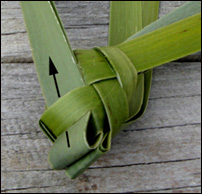
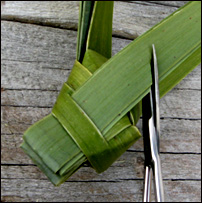
 Holding the strips carefully in place, pick up the cut end of the first strip. Bend it up and over, and poke it through the loop.
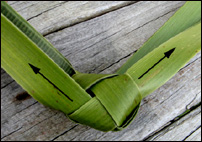
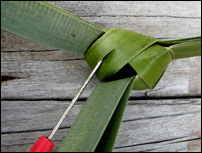
 Pull the strip right through the loop. Now hold the two pointed ends at one end and the two cut ends at the other end and carefully pull the ends to tighten the weaving. When they have been pulled close together, then tighten each strip, one at a time, so that there are no loops left.
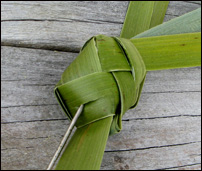
 As a result of the last step, you will now be left with an oblong-ish ball. This will be the body of the bird. The strips with pointed ends will make the wings and the strips with cut ends will make the tail feathers.
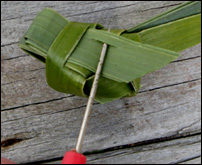
 Pull one of the strips with a pointed end to the side in order to expose the flat part of the body that lies between the two strips with pointed ends. Using a pointed tool, such as an awl or blunt needle, or you can use scissors, to make a two-centimetre split in the flat part of the body. Make the split through the two thicknesses of the strip.
 Poke the pointed ends of both thicknesses of the strip you laid aside through this split, making sure it goes through both thicknesses of the split. To make it easier to poke the points through, fold the strip back on itself near the end and then poke it through.
 Pull the strip right through so that it lies flat. These strips will be shaped later to make the head and the wings.
 Now work with the strips with cut ends. Pull one of the strips to the side in order to expose the flat part of the body. Make another split with a sharp tool in the flat part of the body, as before. Make sure the split goes through both thicknesses.
 Poke the cut ends of both thicknesses through this split, making sure it goes through both thicknesses of the split. If it’s difficult to poke the end through, fold it back on itself near the end and this will make it easier.
 To make one side of the head and one wing, take the pointed ends that you poked through the split, turn them back down and poke them back through the same split.
 Pull them right through until about three-quarters of a centimetre remains poking out. This will make one side of the fantail’s stubby little head.
 Turn the body of the fantail over to make the other side of the fantail’s head. Make a two centimetre split on this side, and make sure the split goes through both thicknesses.
 Poke both thicknesses of the other pointed ends through this split. Pull them through until about three-quarters of a centimetre remains poking out for the second side of the head. Check that both of the sides of the head are at the same height.
 Shape the wings by cutting along the line of the base of the bird, putting a slight curve into the cut. I tend to cut the wings a bit longer than necessary. They can always be trimmed later, but if they are too short, they can spoil the look of the bird.
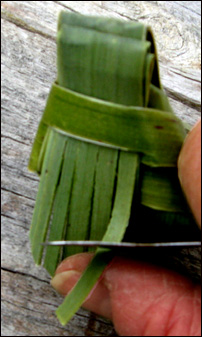
 Using the sharp tool, split the wings into five or six strips to make the wing feathers. Split both thicknesses of flax that make up the one strip.
 Run a knife along the strips one at a time. This will bend the flax a little so that the strips will curl out slightly. This will give some shape and movement to the wings.
 Split each tail piece into three or four strips which will make the feathers for the tail. Keep the widths of the strips the same.
 To give the top of the head a more rounded shape, push a fingernail or the blunt edge of a knife down onto the top of the point. Push this corner into the inside of the strips a little way. Do this on the top of both of the folded sides of the head.
 Pull the point of the beak out a little to give it more of a beak-ish shape. Continue shaping the head until it has a pleasing fantail look to it.
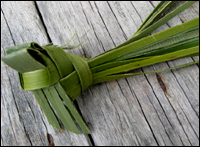
 The fantail’s tail is quite distinctive, so it’s good to take some care with the shape. The whole tail is rounded and the end of each feather is rounded. Cut the feathers a little bit longer than the body and then shape them into a rounded fan.
 Cut the feathers on the sides to a shorter length than the ones in the middle. Starting from the middle, cut the two middle feathers at the longest length for the tail and then cut progressively shorter lengths down one side until the last feather is reached. Repeat this on the other side.
 To make the flax tail feathers sit up and fan out like the real bird’s tail, put a heavy weight on the tail feathers and position it right up by the body of the bird. Push the body of the bird upwards so that it’s lying at right angles to the tail. Spread the tail feathers out in a fan and leave it weighted like this for three to five days, or until the flax has dried.
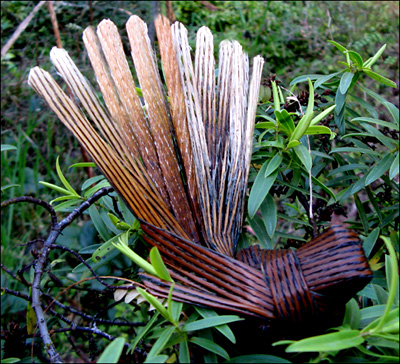
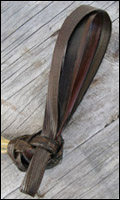
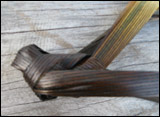
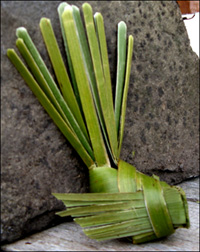 To finish the fantail, you can draw an eye on each side of the head or leave it without eyes. The tail feathers tend to bunch up again once the weight is taken off but they will still sit upright. If the bird is positioned against a solid object, like the stone in this picture, the tail will fan out again.
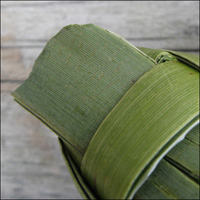
 Netted flax is flax that has been treated in such a way that the soft, green, outer part of the leaf is split and spread apart but not the inner fibre. This process exposes the fibre to give a light, flexible, netted effect. Netted flax is popular for foliage in flower arrangements, partly because of its delicate look, and partly because it can so easily be manipulated into different shapes.
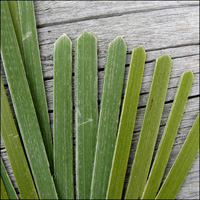
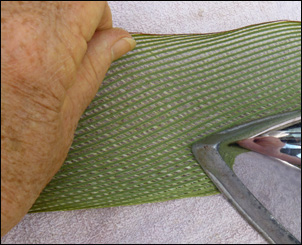
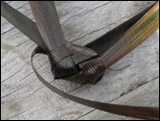
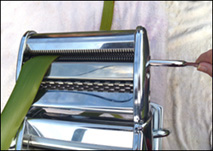 Flax is netted by feeding it on a slight angle through a pasta machine on a narrow setting, as illustrated here. The strip moves across the blades as it is fed into the machine on an angle. When the strip reaches the other side, it needs to be pulled gently to guide it on a slight angle back the other way.
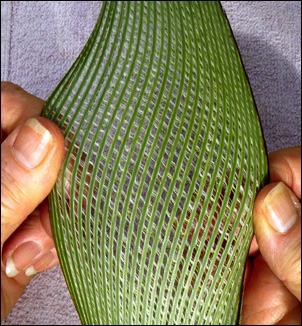 Once the strip has been through the pasta machine the soft, green, outer part of the leaf is split but the inner fibre isn’t cut. To achieve the netted effect, leave the strip for a few minutes to dry out a little and then gently spread it apart to expose the inner fibres. The leaf now has a light, flexible, netted quality. Be careful when spreading the leaf apart as netted flax is very delicate and requires gentle handling and manipulation.
 It can also be made into additional shapes by moistening it to bring the fleshy strips closer together, or to pull them further apart. Ironing the netted flax can help to set it to the desired width although ironing it can change the colour. The netted flax can also be shaped by pinning it out while it’s damp. When buying a pasta machine, check the size of the blades as they come in different sizes. Mine is 1.5mm which makes a delicate, fine netted flax.
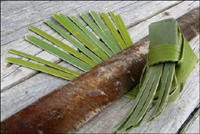
Using dyed, netted flax for the fantail
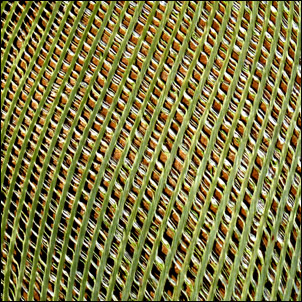
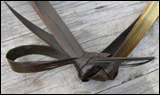
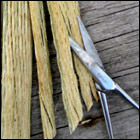
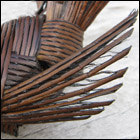 As you can see in the close-up photo here, netted flax nicely matches the feathers of a fantail, so it’s worth the extra effort to use dyed, netted flax. Weave a fantail with fresh flax following the instructions above first, and this will make the instructions below easier to follow. Also, netted flax is a bit more delicate to work with, so take extra care as you weave.
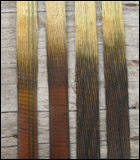 I used two strips of netted flax and two of fresh flax and dyed them using Teri mid-brown dye. I kept twenty centimetres of the cut ends of the strips out of the dye to keep them a lighter colour for the tail. Prepare the two sets of strips for weaving by putting one netted and one un-netted strip together to make one strip as described in the instructions above. Put the netted strip on top of the un-netted strip so that the shiny side of the un-netted strip is underneath and against the dull side of the netted strip on the top.
 Weave the body as outlined in the instructions above. As you pull the weaving together, make sure that the lighter ends of the strips are coming out of the body just at the start of the lighter part of the strip. Complete the fantail to the point where one set of strips each side has been threaded through a split, and the fantail is ready for the head and wings to be made.
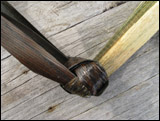
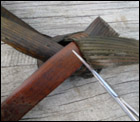
 The head and wings are made slightly differently from the instructions above. To make the first wing, take the pointed strip that hasn’t been threaded through a split, and separate the netted part of this strip from the fresh part. You will make the wing using only the netted part. Twist it to the front of the body as shown in the photo.
 Poke it through the split on the other side, making sure that the shiny side is facing outwards, and pull it back towards the tail. This makes the first wing.
 Now weave the head, which is made in one piece, not two separate sides as in the instructions above. Make a split in the opposite side of the fantail in the same way that the previous splits have been made. Take all three thicknesses of flax that are still poking up and thread them down through this split until just a little bit of the strips are poking out for the head. The netted flax will be on top. As these ends are the fine pointed ends, fold them back on themselves a little bit to make it easier to poke them through the split.
 Lift up the netted thickness of flax which is on the top on this side and trim the un-netted thicknesses off close to the body of the fantail. The netted thickness of flax will be the second wing.
 Trim the wings to length and then pull them back so that they sit at the right angle for wings. Spread the netting of the wings apart to make them look more feathery and keep them in this position as they dry.
 The netted strips that make up the tail need to be cut with scissors rather than split as they are in the instructions above. If netted flax is split, the split will follow the line of the netting, and this would make the tail feathers uneven in width. The un-netted strips can be cut into finer strips or left as they are
 After the tail has been spread out and dried there may be a gap in the middle of the tail. You can fill this gap by adding an extra piece of netted flax, in the shape of a feather. The tail feathers can be kept in place while they dry by threading a thin piece of wire through the netted flax, and arranging the feathers into a fan shape. Masking tape is also handy for holding flax in the right shape while it dries.
 The rest of the netted fantail is completed in the same way as the instructions above. Check the fantail as the flax dries to make sure it is still staying in shape. It can be moulded back into shape while the flax is still damp. Fantails are often seen in pairs, so I suggest you weave a second one to keep the first one company!
© Ali Brown 2011. Last updated 2021