22 September 2010
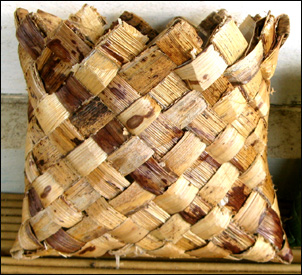
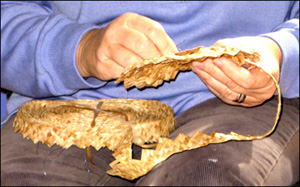
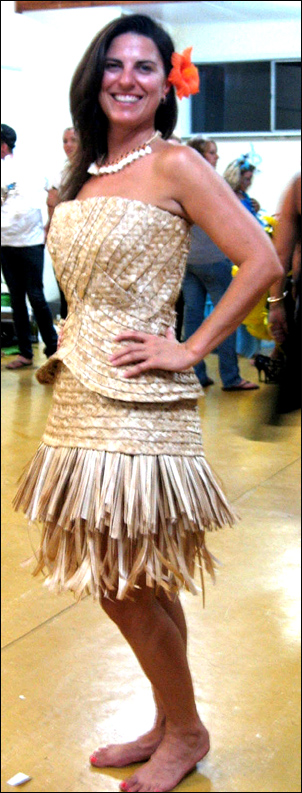 Receiving a text message at 4:15 am in Norfolk Island from my eldest son in Christchurch saying “massive earthquake” was the shocking start to my last day on the island (though fortunately my home was not damaged). I had just spent a week tutoring a series of flax weaving workshops, and spending time with local weavers, at the invitation of Norfolk Island’s Creative Arts community, and was heading home that day with the generous gift of a Norfolk Island hat, woven with Pitcairn Island pandanus by Wayne Boniface. Norfolk Island has a strong creative arts community including a Wearable Art Show. The entry pictured here is a creation made out of drain flax (bulrushes) by Wayne who explained how the design changed as he wove it and evolved into this lovely tropical, summery outfit.
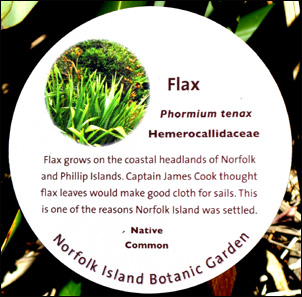 It was interesting to weave in Norfolk Island because there were new weaving materials with different properties to try. Even Norfolk Island Phormium tenax is quite different from the Phormium tenax flax we have in New Zealand. I found it to be much more like Phormium cookianum. The leaves are short, wide, soft and brittle, and have very little fibre content, although this didn’t greatly affect the workshops I took, as the pieces people were weaving didn’t require strong fibre. Although flax grows abundantly in Norfolk Island, it’s not generally used as a weaving material, as the traditional weaving is done with pandanus — a tradition that originated from the original Pitcairn Island settlers.
 Kentia Palms also grow abundantly on Norfolk Island and so I was able to experience weaving with a palm leaf for the first time. I cut a complete leaf off a tree and then used one section with ten leaflets each side of the rib to weave a large two-cornered basket. The leaflets were soft and easy to weave, and are quite wide, and so it took only a few minutes to weave up both sides of the leaf, from the rib upwards, and then weave the corners and finish the top. I used some of the left-over ends coming out of the top to plait a handle up both sides. It’s easy to see why palm frond baskets are used in other islands in the Pacific for everyday use as it’s so quick and easy to weave a large basket.
 I also wove a round bowl from a Kentia Palm leaf using a technique that I hadn’t tried before, which makes use of the leaflets being attached to both sides of the rib. I enjoyed weaving this bowl, and plan to try it in flax, by using the plaited base used to start a large kete to mimic the rib of the palm. Unfortunately I was unable to bring these articles through New Zealand Customs as they were still green. (They could have come through Customs if they’d had time to dry.)
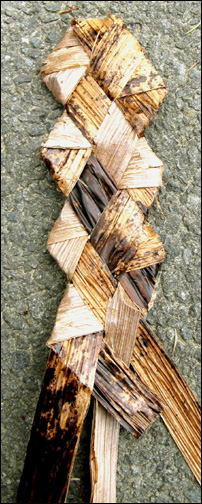
 Another weaving material that is traditional to Norfolk Island, and one I particularly liked because of its mottled brown markings, is rahooloo or banana bark. The bark is easily stripped off the trunk of the tree because the trunk tends to shed its bark anyway. Once the bark is stripped off it is plaited into long strips in preparation for weaving a Norfolk-style hat or a basket. I used single strips and wove a little two-cornered basket which I was able to bring through New Zealand Customs as it was quite dry.
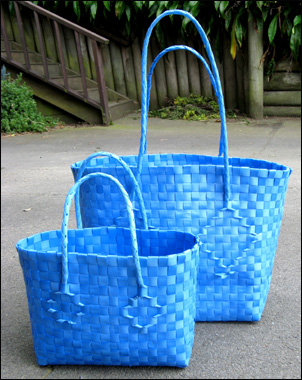 The Norfolk Island weavers also make use of packaging strapping to weave utility baskets, like the ones pictured here, woven by Wayne Boniface. These baskets are woven around a wooden form. The strips are nailed to the bottom of the form to hold them in place and then woven with a vertical/horizontal style of weaving. The handles are made with a four-plait cord, and the ends of the cords are woven into the body on the outside of the basket to create a decorative pattern. These baskets are for everyday use and are ideal when collecting shellfish, as the excess water can escape through the gaps between the waterproof strips.
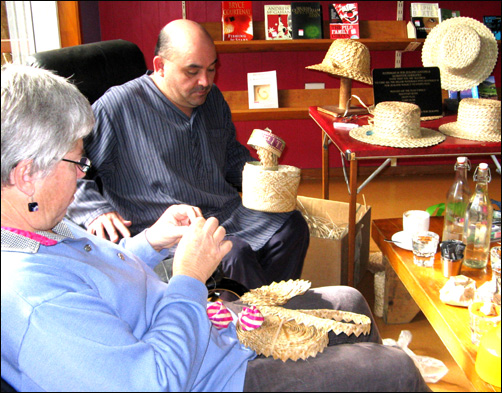 If you are planning a trip to Norfolk Island and would like to meet some weavers, visit the Golden Orb Bookshop and Cafe on a Wednesday. There you’ll be able to see a group of weavers making traditional Norfolk Island hats and have the opportunity to purchase one for yourself. The welcome and friendliness I received in Norfolk Island made tutoring the workshops very enjoyable as we all shared tips and ideas for weaving.
 Although pandanus will no doubt continue to be the most popular weaving material in Norfolk Island, I am hopeful that flax will start to be used a bit more as weavers become accustomed to the different weaving properties it has.
© Ali Brown 2010.
Scroll down to leave a new comment or view recent comments.
Also, check out earlier comments received on this blog post when it was hosted on my original website.
 If you’ve mastered the
 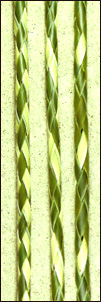 Using six strips opens up more possibilities for different patterns on the cord. The patterning on the cord will depend on which order the colours are hung together at the start and how many strips are used for each colour. The three patterns illustrated here are made as follows: the first sample is made using two green and one white strip on each side, (the white strips were the two strips in the middle), the second sample uses alternate green and white strips and the third one uses five green and one white strip. The same effect will be achieved no matter where the one different-coloured strip is put in the sequence in this pattern.
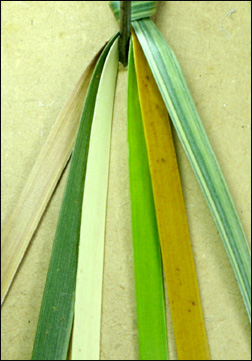 For the sample illustrations, I’ve used six different coloured flax strips to clearly show the plaiting of a rounded six-plait cord. The colours from left to right are pink, blue-green, white, lime-green, yellow and striped. A six-plait cord made from strips becomes rounded because the shiny side of each strip is kept to the outside of the cord all the time as you plait. Start with six flax strips all the same width.
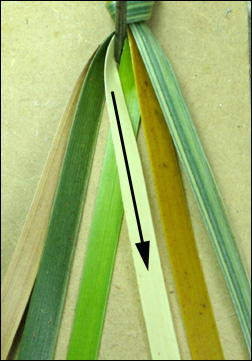 As for any cord, it’s easier to get an even plait if you have one end of the work held by a friend or you tie the end around a solid object such as a chair leg or a nail in a piece of wood. This means you can pull the strands towards you as you plait, so you can keep an even tension on the plaiting. Here I’ve used a nail banged into a piece of wood. Arrange the strips so that the shiny side of each strip is showing uppermost. Start by crossing the left middle white strip over the right middle lime-green strip.
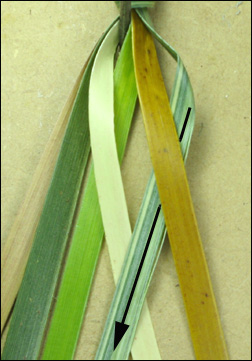 Now pick up the right-hand outside strip, the striped one, and keeping the shiny side of the flax showing, weave it across to the left and into the middle, going under the yellow strip that’s next to it, and over the next strip, which is the white one, so that it rests next to the other middle strip.
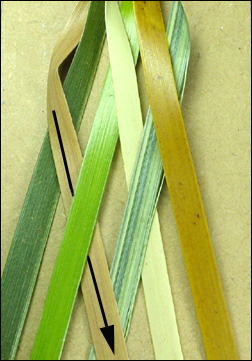 Go to the left-hand side, and keeping the shiny side of the flax showing, weave the outside red strip, into the middle. To do this, take it to the right over the blue-green strip next to it, under the lime-green strip and then over the striped strip. This completes the starting sequence.
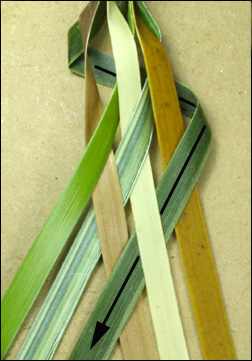 The next sequence of movements are the ones that are repeated to make the six-plait cord. Go to the left-hand side and take the blue-green strip back behind all the other strips, and then bring it around and to the front, keeping the shiny side on the outside all the time. Now weave the strip into the middle of the strips. Do this by taking the blue-green strip over the yellow one, under the white one, and over the red one, so that it is now in the middle.
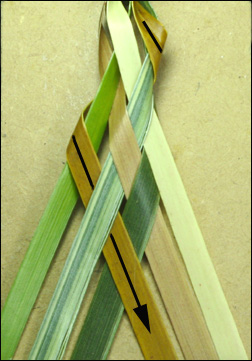 Go to the right side and, keeping the shiny side on the outside, take the yellow strip behind all the others, and then bring it around to the front. Now weave it through to the middle of the strips. Do this by weaving it over the lime-green one, under the striped one and over the blue-green strip to the middle.
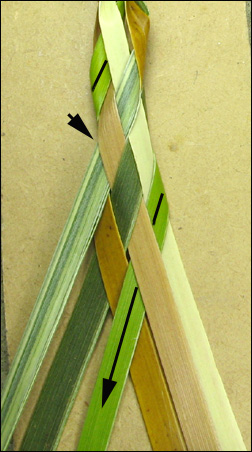 Repeat the above two movements to continue the plait. Go to the left side and, keeping the shiny side to the outside, take the lime-green strip around the back and bring to around to the front. Now weave it through to the middle of the strips. Do this by weaving it over the white strip, under the red strip, and over the yellow strip to the middle.
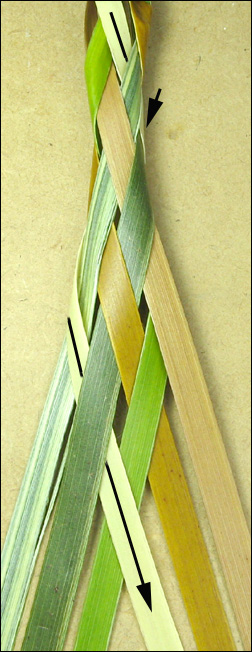 Go to the right side and, keeping the shiny side to the top, take the white strip behind all the others and bring it around to the front. Now weave it through to the middle of the strips. Do this by taking it over the striped one, under the blue-green one and then over the lime-green strip to the middle. Repeat this sequence, remembering to alternate the sides that you pick up the strip to plait with. A way to make sure that you are choosing the right strip to start each plait with is to compare the outermost strips on each side. The strip that emerges from the side of the plait at the lowest point is the one to use. For example, in this photo here, it is the striped one on the left which is the one to plait with as it’s lower than the red one on the right.
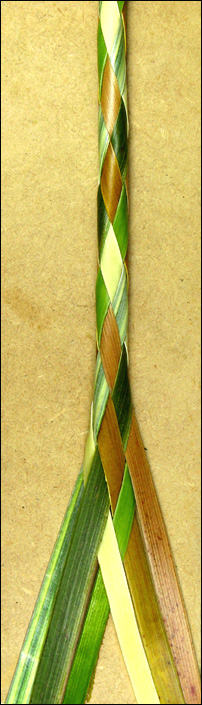 As you plait, pull the strips up tightly together so that the cord becomes rounded and tightly plaited. This roundedness is not apparent with the first two or three movements but does become clear soon enough. I made this cord with six differently-coloured strips to make it easier to follow the instructions, but, as the photos at the top of this post show, it’s fun to use this plait to make differently patterned cords. The cord is not as strong as others as it has a hollow core. A stronger cord can be made by doing this six-plait with shredded flax.
 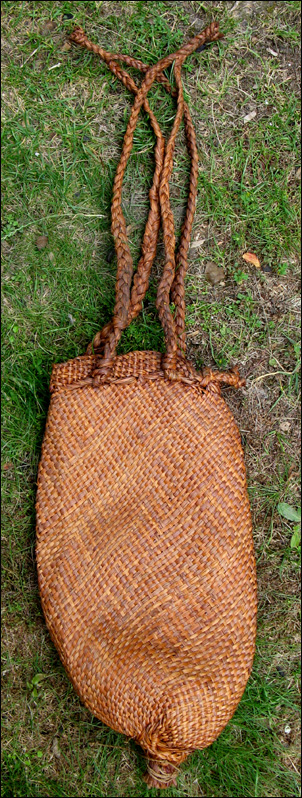 I saw this woven bag hanging on a stall in a local Saturday market and the long cylindrical shape of it caught my eye. I had a closer look and noticed that the well-used bag had been woven with a good deal of skill, and I hadn’t seen some of its weaving techniques before. I was interested to study the construction of the bag in more detail, and so I bought it.
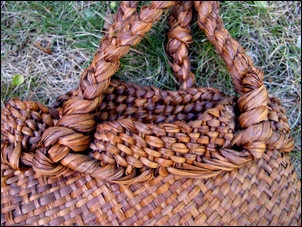 I found the weaving at the top of the bag particularly interesting.The main body of the bag is woven diagonally, but the weaving changes to a vertical and horizontal weave which makes a straight edge around the top of the bag. After the completion of the top, the ends of the weaving strips exit the weaving at the base of the top, and are twisted along together to two points on each side, where they are plaited to make handles.
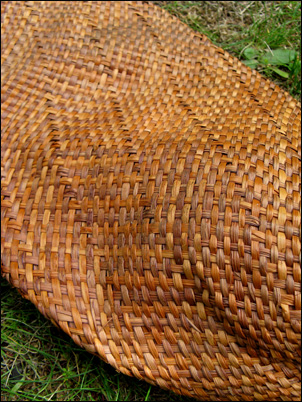 A simple one-over, one-under diagonal weave is used for the main body of the bag. However, a spiral pattern in the weave shows up when the weaving is seen from an angle. This spiral pattern is made by one strip being woven over two strips in a row, with this happening at the next point across in each consecutive row, thus making the spiral pattern. This change in the weave may also help to shape the bag.
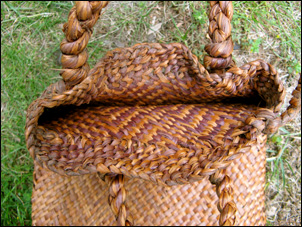 The difference in the colours between the outside and the inside of the bag probably indicates that the bag has been used a lot. The colour on the outside of the bag is a faded mid-brown, but on the inside two colours are visible — a deep mid-brown and a dark rich brown — and these have been used to make a patterned design in the weave. Both shades appear to be the natural colours of the material, so maybe the material was treated in different ways, either with natural dyes or by another method, to achieve the differences in shade.
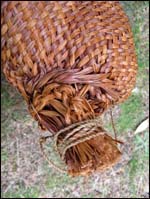 It’s difficult to work out how the base of the bag has been constructed, but it appears that all of the strips have been pulled and twisted together and then a plait has been woven around the strips to hold them in place. A single fine twisted cord also holds it all together. I have seen a somewhat similar type of finish on a jute string bag made in Bangladesh, but in that case the construction — where the threads are all pulled together around a circlet and then tied together in a large knot — is easier to see.
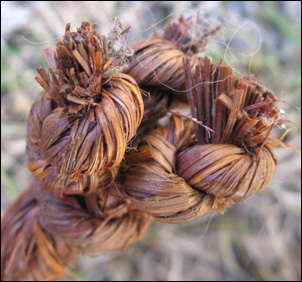 One of the things that I find particularly appealing about the bag is the effort that has been put into the detail. For example, the knotted ends of the handles. The handles of the bag are made by plaits coming from the body of the bag. Each handle is initially made with two plaits, which are joined together at the ends into one plait, as shown in the top photo. Instead of finishing this plait off with one large knot, it’s finished by separately twisting and knotting each one of the strands that was used to make the plait, which ends up as three small knots bunched together. This detail, combined with the skilled construction of the bag, make this bag a very fine example of the craft of weaving.
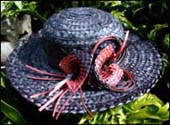 I’ve really enjoyed reading the many letters, emails and blog comments that other weavers have sent me since I published my book. It’s fascinating to read about people’s weaving experiences and to see photos of their work, especially when it’s something I haven’t tried myself, such as weaving flax head-gear.
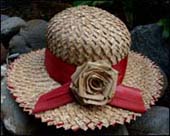 The photos I’ve used on this blog post were sent to me by Lesley Jenkins and Wayne Boniface of Norfolk Island. These beautifully-woven and decorated hats are made in a traditional Norfolk Island weaving style. Norfolk Island doesn’t have much in the way of weaving material so the islanders use what they can, including banana tree bark, corn husk, drain flax (this is not Phormium tenax, it looks like bulrush to me), Moo-oo, or
 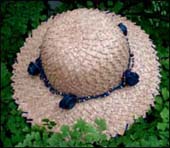 Lesley and Wayne use pandanas and Moo-oo which they gather from the cliffs around Norfolk Island. As with many plants used for weaving, Moo-oo has razor edges which are stripped off. It’s then left to dry out for about ten days before use. The traditional method is to plait the material into one long flat strip, which is then wound around and sewn into a hat shape. Lesley and Wayne have used a variety of different styles of flowers to decorate their hats in attractive ways.
 Another email I received recently was from Greta Nicholson, who enlisted the help of her son to make a
  Writing a book can be such a long-winded, solitary business that it’s great to get feedback, and all the positive feedback has inspired me to extend and update it at some point soonish.
  One of the additions will be a flax pohutukawa flower which I recently created for Miss World New Zealand 2009, Magdalena Schoeman, to wear in her hair in the Miss World Pageant in South Africa. It took a while to figure out how to make the pohutukawa and I don’t currently have written instructions for it, but it will certainly feature in the updated version of the book. I was notoriously wrong in my predictions about how long it would take to publish the first version of the book, so I’m not making any predictions about when the updated version will be published! ??
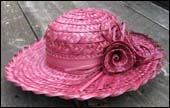 Addition 27 Jan 2010
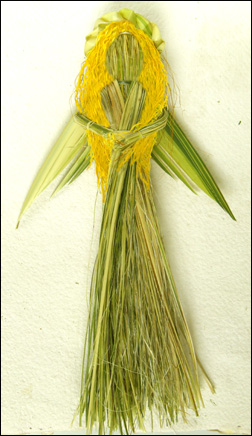 The flaxen-haired angel in the photo is a variation on the flax angel I posted
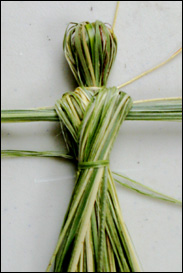
 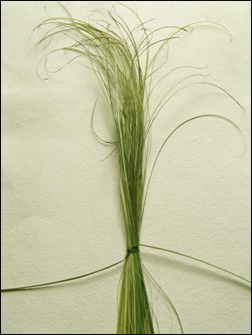 Start making the angel by shredding some flax with an animal comb or fork and tying a bundle of it with a strip of flax. Tie it with a double knot quite near the narrow ends of the shreds. Pull some of the waste flax out of the comb you have used to shred the flax with, and roll it into a small ball.
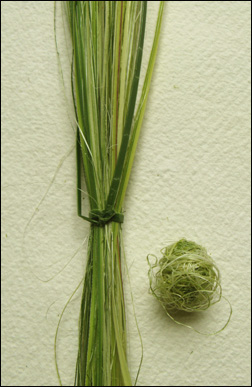 Position the flax ball into the middle of the shredded flax just above where it has been tied.
 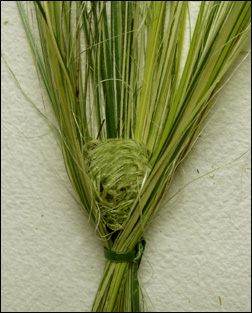 This is going to give some shape to the head. It’s quite tricky to keep this flax ball in place so you may find it’s a good idea to put some glue at several points around the circumference of the ball to hold the shredded flax in place as you continue to make the angel.
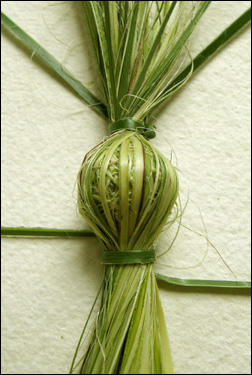 Tie another strip of flax at the top of the flax ball making sure that the flax shreds completely surround the flax ball.
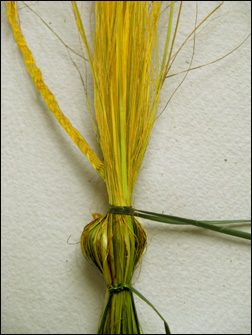 At this point I dipped the long thin ends of the shreds, up to the top tie, into boiling yellow dye, as I wanted the angel to have golden curls, but this is not an essential step. I used Teri Golden Yellow dye, and, as I used a flax with quite a lot of white in the colouring, it only needed a brief dip in the dye.
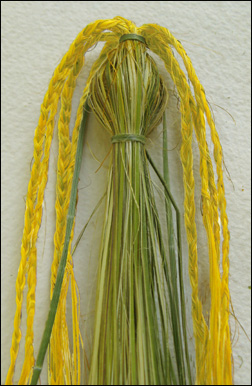 Now plait the long thin ends that come out of the top of the head into long braids. Separate the fibres carefully and make sure you are using fibres that come from the same area of the head for each braid.
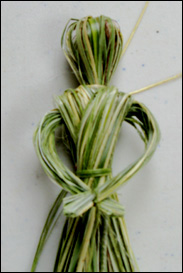
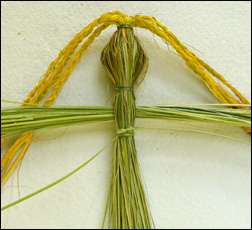 Shred a little bit more flax for the arms. Tie the shreds together in the middle to make a bundle and then slip this in between the shredded flax of the body. Push it up so that it’s right underneath the tie for the neck. Tie another piece of flax around the body below the arms to create a waist.
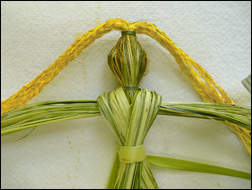 Now shred some more flax and divide it into two bundles. Drape one bundle over the right shoulder and bring it across the front of the body to the left. Drape the second bundle over the left shoulder and bring it across in front of the body to the right. Tie these in place around the waist with a wide strip of flax.
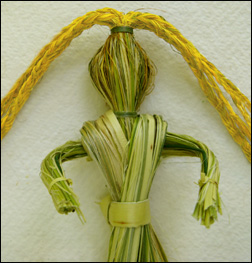 Bend the arms around to the front, tie a thin strip of flax around the flax at the right distance to make wrists for the arms and then cut off the ends of the flax, and shaping the ends into hands. Hold the hands together temporarily with a tie of flax so that as the flax dries, that arms stay in the bended shape.
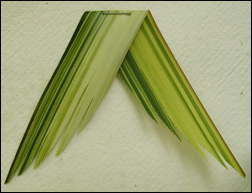 Now make the wings. I’ve used a thin, soft variegated flax for the illustration here but the thinner flax tends to curl up too much as it dries so I suggest you use a thicker flax for this style of wings. Take a piece of a flax leaf and scrape a blunt knife along both sides to soften and dry it a little to prevent the wings from curling up. Fold the flax on an angle with the fold at the top and a piece of flax coming down at an angle on each side and cut these sides into wing shapes. Staple the pieces in place close to the fold. Split each wing into about five strips just a bit over halfway along the wing. Use fine scissors to round the end of each strip and then cut up the strip a bit to narrow it and to give a feathery effect.
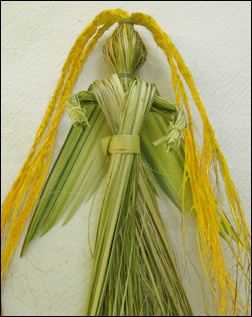 Position the wings just at shoulder height on the angel and attach them with glue or double-sided tape or a staple. I used double-sided tape which I find holds the wings securely.
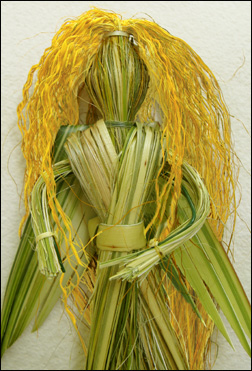 It’s now time to unplait the braids and let the angel’s hair down! Or you could leave the braids in place, for a more funky look for the angel. If you do this, I suggest you plait some more braids separately and then sew them onto the angel’s head as they could be a bit sparse otherwise.
 To make the angel’s halo, take a thin strip of flax, about .5 cm wide and as long as you can get it without using the tough bit of the leaf. Soften it with a knife and then fold it at right angles in the middle of the strip. It’s easiest to do this on a flat surface to start with.
 Take the end of the strip that is out to the left and fold it across to the right over the first fold.
 Take the end of the strip that is pointing up to the top and fold it down over the strip pointing to the left, folding it neatly against the other strip.
 Continue to fold the strips over each other like this, until you have used up all the length of the strip. Make sure you fold the each strip squarely and closely up against the last strip otherwise the halo will be a bit loose, which may not be appropriate for an angel!
 Hold the ends closely so that the folded strips don’t come undone and then curl the strip into a circle. Attach the ends together so that the halo is the right size for the angel’s head.
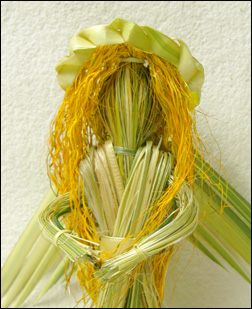 Attach the halo to the back of the angel’s head with glue or double-sided tape. Trim the long hair and arrange it so that it sits prettily around the angel’s shoulders and your angel is completed.
 Do you meet in a flax weaving group that is open to new participants or visitors? If so, do add a comment on this blog post with the group’s location, contact details and perhaps any other information you think might be of interest. If there are enough groups, I’ll create a Flax weaving groups section on the new
  It was fun googling for links, and I came across a number of examples of flax weaving online that I hadn’t seen before, like the wall hanging by Jess Parone, pictured on the right, and the sculpture by Jan van de Klundert, pictured below. In the last few years, I’ve noticed that more and more examples of flax weaving have been going online. There is always something new.
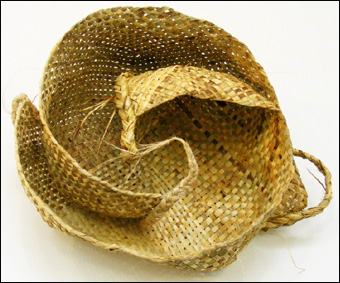 It’s good to see the increasing interest and exposure of flax weaving, and I’ve also been surprised and pleased by the number of people from other countries who have bought my book. It seems that New Zealand flax is spreading all over the world. Also, I don’t know whether it is the same in other cities, but more and more new houses in Christchurch seem to have flax plants in their front garden.
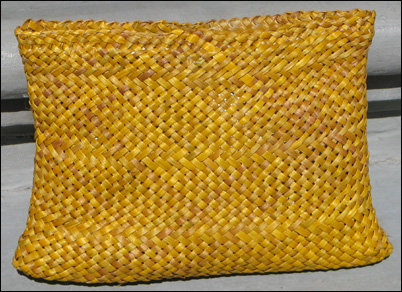 A plant with the common name cutty grass — with its reputation for cutting fingers if they’re run along it — is an unlikely plant to use for weaving, especially as its short, narrow blades limit its use. However cutty grass, or pīngao, a native coastal plant, has one quality that, for weavers, surpasses its apparent shortcomings and that’s the deep golden yellow colour that it changes to once it’s dried. The beautiful little kete pictured here, woven by
 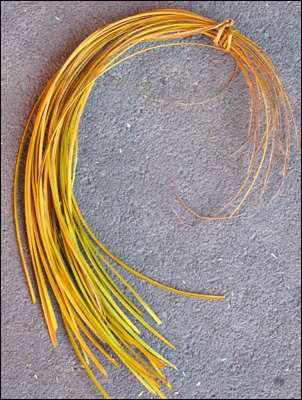 My interest in pīngao was sparked when one of the participants in a recent workshop brought some pīngao blades along to weave with. Karen, who bought the little Kohai Grace kete a couple of years ago, had been growing the pīngao for three or four years and it had reached the stage where the blades were long enough to use. The blades are mostly midrib with a small amount of soft leaf each side, and with one side narrower in width than the other. The blades are quite hard but soften very easily when a knife is run along them. Karen discovered very quickly that it was wise to have gloves on when softening the blades as it lived up to its name of cutty grass. She also found that she didn’t need to soften the pīngao as much as she normally would with flax and that the narrowest side of the blades tended to split off. She ended up removing this narrow side on all the blades although she may not have needed to if the softening hadn’t been quite as vigorous.
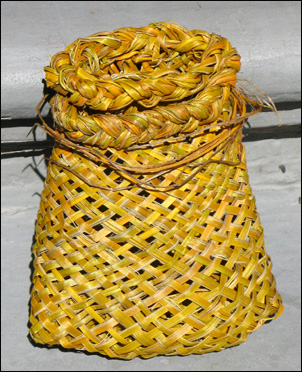 Karen wanted to use the whole length of her pīngao blades and so wove a kete that was joined at the bottom, ending up with a kete about twelve cm high. She plaited around the top, continuing the plait with the remaining lengths until they were used up and then wound this thick plait around the top of the kete. As Karen wasn’t happy with her first attempts, the pīngao strips were worked quite a lot as she undid and rewove her work and the stress on the blades, where they’ve split and shredded, can be seen in the photo here. However, the final kete has its own character and uniqueness and is attractive as a whole.
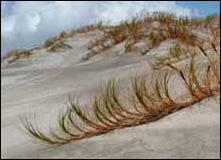 Although pīngao, a sand-binding plant, whose long trailing rhizomes help to stop erosion on sand dunes, once grew plentifully on coastal sand dunes throughout New Zealand, its growth declined rapidly as a consequence of burning and grazing by wild and domestic animals and overgrowth by marram grass. Harvesting methods have also contributed to this decline. Studies show that cutting a whole leaf cluster from the plant or wrenching the blades from the plant damages the growth. Clipping individual blades is now recommended as the most desirable harvesting method as it means only the useable blades are cut and that the plant is not damaged during the process.
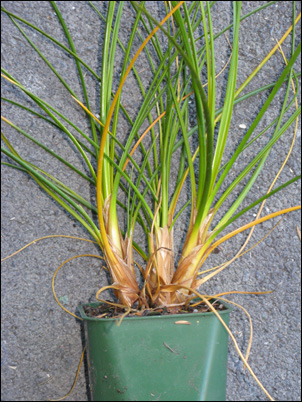 As I don’t have ready access to harvesting pīngao, and it seems to be relatively easy to grow, I decided to grow some pīngao plants in my garden. I bought six plants, grown from seed sourced from
  The book I’ve been writing, Weaving Flowers from New Zealand Flax, is now ready for sale. It contains detailed instructions for weaving fifteen different flower and foliage designs as well as different variations of several of the designs. The book also includes examples of flower arrangements for the designs, and additional flax foliage ideas for flower arrangements. Most of the flower designs can be woven from a single flax leaf, and are very quick to weave once you’ve had a bit of practice — many of them are much quicker to weave than the flower design shown on the Weaving a flax flower page in the Instructions section of this website.
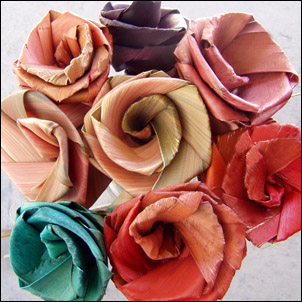 Flowers woven from flax have become very popular over the last couple of years or so. Bunches of woven flax flowers are now offered for sale on TradeMe, and on the websites
 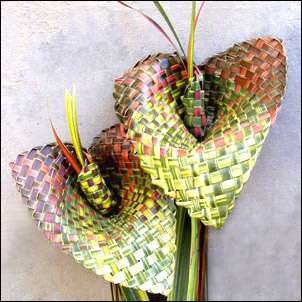 Woven flowers also make great projects for a beginner in flax weaving, and one of the advantages of flax flowers is that any variety of New Zealand flax can be used to weave them, including the coloured, variegated flaxes that are often grown as decorative garden plants throughout the world. Most of the instructions in the book are illustrated with the coloured flaxes, and show how nice they look as woven flowers. Of course, New Zealand flax is not essential for weaving flowers. As I mention on my
  Although most of the designs in the book are made from a single flax leaf, a few designs or variations are rather more elaborate, and one or two — like the sunflower shown on the right — require many leaves. Other photos from the book are shown in my
 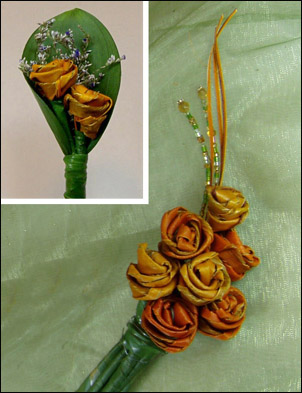 At the same time that I’m putting up this blog post, I’m also emailing all the people who have asked to be notified when the book came out, including some people who bought an earlier booklet that I put together rather quickly in 2007 when I was invited to
  Incidentally, the price of the book is considerably higher than the earlier booklet. This reflects the increase in size, from a 16-page booklet of 5 flower designs with small photographs to a 115-page book of 12 flower designs and 3 foliage designs with much larger photographs and more detailed instructions, as well as flower arrangements and additional flax foliage ideas.
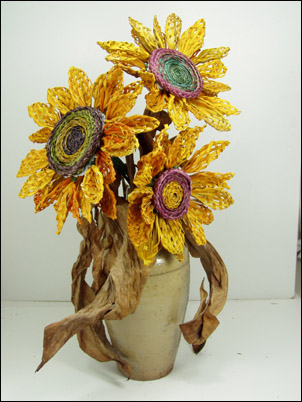 I imagine those who purchased the earlier booklet will find the book greatly improved. As well as the increase in size and detail, the quality of the photographs, instructions and layout is also much improved. However, I’ve no doubt that the book can be improved still further. If you
 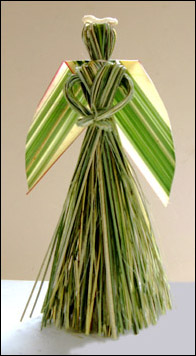 Even though there are only a few days to go before Christmas, there’s still time to make the odd flax decoration. Shredded flax lends itself to making an angel in much the same way that straw and grasses have traditionally been used to make angels in other cultures, and it is a very quick and easy design to construct. I’ve used variegated flax for the angel design illustrated in these instructions, which gives the wings a textured look, although any flax that not too strong or thick is suitable.
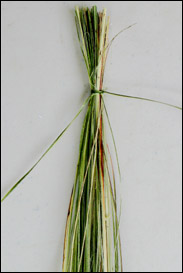 Shred two or three flax leaves with a fork or dog comb. Tie the shredded flax into a bundle with another piece of flax.
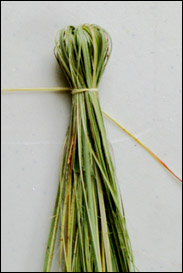 Turn the bundle up the other way so that the tie is inside the bundle and the shredded flax hangs down and around the tie, then tie another strip of flax around the bundle. This will make the neck of the angel.
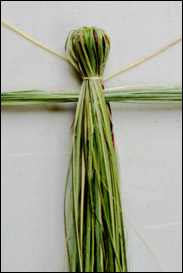 Shred a little bit more flax for the arms. Tie the shredded flax together in the middle and then slip it in between the shredded flax of the body. Push it up so that it’s right underneath the tie for the neck.
 Tie another piece of flax around the body below the arms to create a waist. Now shred some more flax and divide it into two bundles.
 Drape one bundle over the right shoulder and bring it across the front of the body to the left. Drape the second bundle over the left shoulder and bring it across in front of the body to the right. Tie these in place around the waist.
 Bend the arms around to the front and tie them together in the front of the body. Cut off the ends of the flax, shaping the ends into hands.
 To make very simple wings, take a piece of a flax leaf and scrape a blunt knife along both sides to soften and dry it a little to prevent the wings from curling up. Fold the flax on an angle with the fold at the top and a piece of flax coming down at an angle on each side and cut these sides into wing shapes. Staple the pieces in place close to the fold. (I used variegated flax to make the wings look feathery but no doubt more elaborate wings could be made by splitting and folding the flax in other ways). Attach the wings to the angel’s shoulders at the back. I stapled the wings on but you could use superglue.
 You can draw a face on the angel or use a shell for her face. I’ve left the face as it is but have given her a halo by placing a rounded, smoothed-by-the-sea piece of shell on the top of her head.
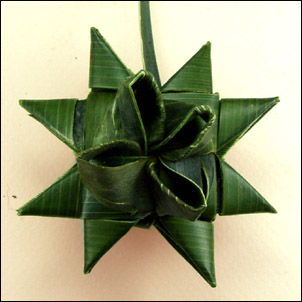 The flax weaving techniques used in basket making are often the same techniques that other countries around the world use in their traditional weaving, although the raw materials are different. I always find it fascinating to see a sample of this universal nature of weaving, so I was most interested when one of my students showed me a three-dimensional star, made with birch bark, that she had purchased on her recent visit to the USA. The star is the same as the one shown on the blog post,
 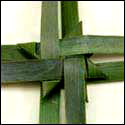 To make this three-dimensional star, follow the steps for making the eight-pointed star on the
 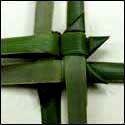 Take the top strip of the two end-strips that are laying out to the right and bend it back on itself. The folded point underneath it is now showing.
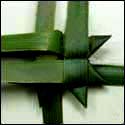 Take the right-hand strip of the two end-strips that are coming out from the bottom of the star, and fold it up to the top, exposing the folded point at the bottom right.
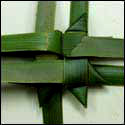 Now fold it across to the right on a 45-degree angle. Keep the start of the fold as close to the centre of the star as possible. Press it down to crease it.
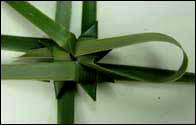 Bring the end of this strip back around and poke it underneath the first strip that was bent back on itself. Push the end right through so that it comes out between the middle of the folds of the top point on the left.
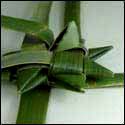 Pull the strip through until it folds around into a spike. Don’t pull too far or it will undo the spike. Squeeze the strip to make it more spikey. Alternatively, to make the spike more open, push your finger into the centre of the spike and push the flax out to shape it.
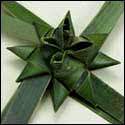 Repeat these steps for the other three strips on this side of the star. As this version has a flat side, it can be used to tie around gifts.
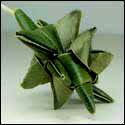 For the second version of the star, make spikes on the other side in the same way as the first side. To finish, cut off all the ends. This side view shows the spikes poking out from both sides. To hang the star up, split a thin strip off the inner side of one end and cut the rest of the strip off.