Links to sections of this page
Natural colours
Natural dyes
Synthetic dyes
How to dye flax strips
Minimising the loss of sheen
Natural colours
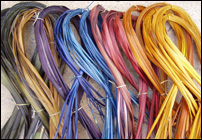
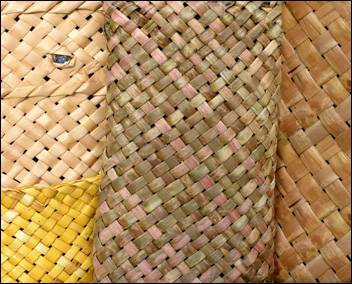 Different flaxes dry naturally to a variety of different colours, ranging from nearly white, to deep yellow, and different greens and browns. To my eye, these colourings are beautiful and I have moved away from dyeing unless I am preparing images for my books, where, as illustrated in the image at the top of this page, colours play a role in illustrating weaving moves. The image here on the right shows the wide variation in the colours that different, unboiled flaxes can dry to. Boiling flax can change the colouring too. In addition, flax leaves can have different colourings and markings on them, such as rusty lines, and these can be used as a feature in weaving. Landcare Research has comprehensive information about these different colours on their website.
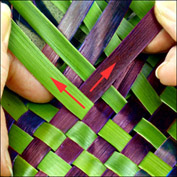
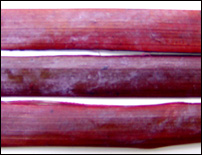
The way flax is cared for before and after weaving can also affect the final colour and appearance of the finished product too. For example, if unboiled, dried flax is soaked in water, it usually dries to a darker shade similar to a fawn, as shown in the piece of weaving on the right of the image, rather than the lighter shades of cream that are common for unboiled flax. Other colours may result in different colours appearing in the final woven product. For example, some green flax leaves which I kept damp for 2 to 3 weeks by leaving them in dewy wet grass before I wove them, dried with reddish colouring in some of the strips, as shown in the middle piece of weaving in the image.
Natural dyes
Natural dyes can be found in a large variety of plant material. Traditionally, bark from trees is used to create yellow, red-brown, blue and black dyes and Kowhai flowers produce varying shades of gold and yellow. A black colour can be obtained by burying the flax in a certain type of black mud that has a high iron content. The books “Māori Weaving” and “Know Your Māori Weaving”, reviewed on my Reviews page, have lists of plants that are traditionally used for natural dyes. As with any dyeing, the results from natural dyes will not be consistent so expect a degree of variation between batches.
Synthetic dyes
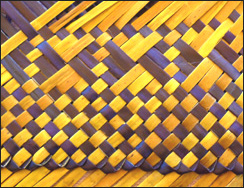
Dyed flax can be used to change the appearance and add another dimension to flax weaving. For example, in the image here, a traditional pattern is emphasised by the use of dark and light-coloured strips. As flax is a cellulose fibre it’s important to choose a dye suitable for cellulose and the most common dyes used are listed below. Different colour results will be achieved from dyeing different flaxes, and flax fibre dyes to more vibrant and often different shades than flax strips dyed in the same dye, so it’s best to do tests with the flax you are using to see the results of the dyeing before dyeing the bulk of your flax.
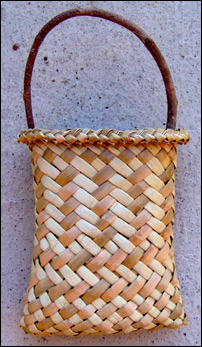
 Rit and iDye Poli dyes: Both of these dyes are available through the online shop of fellow weaver Rita Baker of Flaxworx NZ who can give you all the information about these dyes. RIT DyeMore Synthetic is a new version of the old liquid Rit dye, and has been reformulated so that it is again suitable for New Zealand flax / harakeke. It offers a consistent, natural-looking result and although the colour range is limited, it can be mixed. iDye Poli powder dye is specifically formulated for synthetic fibres and plastic but also takes wonderfully on New Zealand Flax/harakeke and has more prime colour choices than the RIT. This kete pictured here is the Koeaea or whitebait pattern, which is Pattern 11 in Raranga Whakairo listed on the Reviews page.
 Teri Dyes: New Zealand-based Teri Dyes produce Phormalan liquid dyes especially for flax. They have eight base colours plus eight mixed colours, including Forest Green, which I used for the kete pictured on the right. They also have instructions on how to mix colours for yourself. The variation in colour seen in the green kete is obtained by not stirring the strips when they are immersed in the dye. The dyes come in 250ml, 500ml, 1 litre and 2 litre bottles. For a price list and colour cards contact Ioulia Crowley — email teri.dyes@xtra.co.nz, phone 027 376 4656, or write to PO Box 12096, Inner City Post Palmerston North 4444, New Zealand.
 Dylon dye: The English-manufactured Dylon dye is readily available from chemists and supermarkets in small tins or larger 100 gm packets in powdered form, but some outlets will stock only a limited range of colours. Dylon dyes are normally sold for fabric dyeing, and come in both hot and cold water versions. The hot water dye works well on flax, and will give a soft, natural colour that allows the texture and fibre of the flax to show through. The manufacturer’s instructions give amounts of dye to use based on fabric weight, so it can be difficult to know how much dye to use for flax. To get around this problem, I’ve used all the dye in the packet for a relatively small amount of flax, checked the strips frequently and taken them out of the dye solution as soon as the flax reached the desired colour. The brown strips in the brown-and-cream kete illustrated on the right were dyed with Dylon.
How to dye flax strips
 You’ll need:
1. A large pot that is not used for cooking.
2. A pair of tongs.
3. A large container of cold water.
4. Disposable vinyl or rubber gloves.
5. Your chosen dye.
6. Lots of newspaper.
7. A rack to hang flax strips on when dyed.
8. If there are a lot of strips to be dyed, allow plenty of time.
To prepare flax for dyeing, cut the number of weaving strips required and scrape them with a knife to soften the strips. Tie the flax strips in bundles of ten strips ready for dyeing. The same basic method is used for all the different chemical dyes although Teri Dyes recommend that the strips are boiled in water for about three minutes first and then left to partially dry before dyeing. Although it’s not essential, you can boil the flax before dyeing it with the other dye brands too if you want a very even colour, although I haven’t found that it’s necessary to leave the strips to partially dry before dyeing.
Fill the pot approximately two-thirds full with water and bring it to the boil. Add the dye, mix thoroughly and allow the water to come back to the boil. When the dye is boiling, use a pair of tongs to lower one bundle of strips into the dye. For an even, strong dye, all the strips should be completely covered with the hot dye solution. Gently move the flax bundle around, making sure each side of each strip is in the dye. Boil the strips for three to five minutes, checking every now and then to see how much dye the flax has absorbed. For a denser colour, leave in the dye solution for longer a time. When the flax has reached the required colour, lift it from the dye with the tongs, rinse it in the container of cold water for a minute or two, and then hang it out to dry off. Dye each bundle in the same way, checking the colour of the bundles as they are removed from the dye. If the colour is starting to fade, add more dye to the pot, unless you want to try out variations in shade for the sake of different design effects. (Check out the blog post Simple designs for dyed flax).
The strips are ready to use when the excess moisture has dried off and they feel damp rather than wet. If you don’t want to use the flax straight away you can dry and store it, and then remoisten it when you want to weave it, as outlined on the Preparing Flax page. When re-moistening, keep the differently-coloured flax strips separate.
Minimising the loss of sheen on dyed flax
Boiling — with or without dye — tends to reduce the amount of sheen on the flax, though the extent to which the sheen is reduced varies from one flax variety to another. If you’re planning to dye in an intense colour, it’s a good idea to select a variety that will be relatively shiny after dyeing. To my eye, the more intense the dye colour, the more the flax needs some sheen, or otherwise it tends to look rather flat and dull.
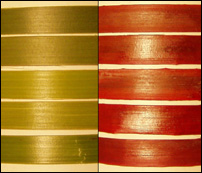 The sheen results from a layer of wax on the surface of the flax leaf, and different flax varieties vary in the amount of sheen they have naturally. However, the amount of sheen on a fresh leaf seems to provide no indication of the amount of sheen that will be visible after dyeing. Sometimes relatively shiny fresh leaves will be quite dull after dyeing, and sometimes the more dull leaves will be relatively shiny after dyeing — as you’ll see on the photo, which illustrates the same five flax varieties on the left side of the photo as on the right, before and after dyeing.
As a very general rule, tougher and/or older leaves seem to retain sheen better than softer and/or younger leaves, but you really need to try dyeing a few strips of the particular flax variety you’re thinking of using, in order to find out how shiny it will be after dyeing.
See if you can find a flax variety that has a dull whiteish appearance on the underside of its leaves — these varieties seem to retain their sheen relatively well after dyeing. In fact, it seems that the whiter the underside of the leaf, the more likely it is that the sheen will be retained. Try to avoid Phormium cookianum varieties — generally, they tend to lose a lot of sheen, although the odd variety retains a reasonable amount of sheen.
 Boiling flax tends to dislodge the wax layer, as well as reducing the overall sheen. Dull white patches of wax can often be found on boiled strips, and when they are, the surrounding areas on the strips are also likely to be dull. If you rub the white patches with your thumb, you’ll find that the whiteness disappears and some of the sheen is restored to the leaf. However, I’m not suggesting that you go over all the strips with your thumb.
Generally, just by softening the strips with a blunt knife for weaving, and weaving with the strips, the white patches will get rubbed back onto the surface — as a result of the normal handling involved in softening and weaving.
Avoid drying the flax you’ve taken out of the dye solution by wiping it with a towel while the flax is still hot, as this tends to wipe off the wax completely. It’s best to rinse the flax in a container of cold water for a minute or two after it’s been dyed. This lets the wax harden a little and then it’s more likely to rub over the surface rather than rub off it.
There are another couple of things to avoid. Don’t dye pre-boiled strips that have fully dried out — this is likely to result in a dull finish. Likewise, dyeing a woven item after the flax has begun to dry also tends to result in a dull finish. Another reason to avoid dyeing after weaving is that the dye is unlikely to fully penetrate the strip surface that lies underneath other strips, so when the flax dries and shrinks a little, it will reveal these relatively undyed portions of the strip. This effect can be lessened if the woven item is pre-boiled in water for a few minutes before it is dyed.
In light of the fact that boiling tends to reduce the sheen, it would seem logical that the longer the flax is boiled, the less sheen there will be when it has dried. However, in a series of experiments I did with different flax varieties, there was no additional loss of sheen as a result of boiling the flax for 15 minutes compared with boiling it for 5 minutes. Also, the two-step process I referred to earlier doesn’t seem to cause any greater loss of sheen — boiling the flax in plain water, then removing the flax and mixing in the dye, followed by immediately boiling the flax in the dye solution.
© Ali Brown 2006. Last updated 2025