9 July 2008
 According to archaeologists, cords have been made by plaiting or twisting plant materials since about 17,000 BC, typically nettles, hemp, cotton, sisal and jute. In traditional Māori culture, cord has been made from New Zealand flax, which is probably at least as strong and durable as any other plant material. Before rope began to be made from plastics in the late twentieth century, its manufacture from flax fibre was one of New Zealand’s major export industries.
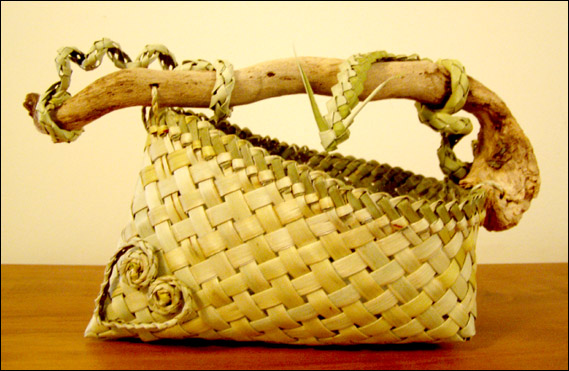
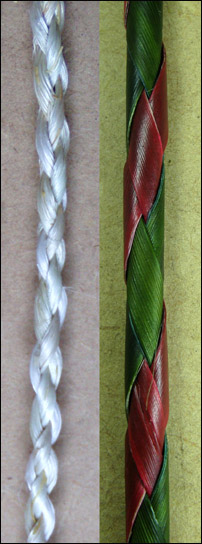 Flax can be plaited from its fibre or from strips, and the photo to the right shows a four-plait made from flax fibre, or muka, on the left side of the photo and one from strips on the right side. A plait made from fibre is a good deal stronger than one made from strips, but plaited strips are much quicker to make and look quite attractive, particularly the four-plait, which can be woven in a tubular shape. A disadvantage of the tubular shape is that it can become crushed if used as a handle for a basket carrying heavy weights, but it’s quite suitable for a small basket and it’s particularly suitable for a pendant.
A number of the participants in my workshops have asked me how to weave a tubular four-plait, and I know of only one flax weaving book — Fun with Flax — that includes instructions. Unfortunately, people have not always found written instructions easy to follow, so I’m not sure whether the instructions below will be easy to follow either. If you don’t find them easy, you won’t be alone. It sometimes takes a while to get the hang of four-plaiting even when it’s taught in person.
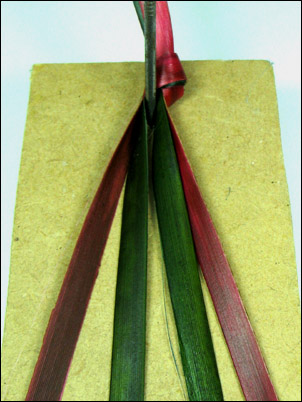 A four-plait cord made from strips becomes tubular because the shiny side of each strip is kept to the outside of the cord all the time as you plait. Start with four flax strips all the same width. As for any cord, it’s easier to get an even plait if you have one end of the work held by a friend or you tie the end around a solid object such as a chair leg or a nail in a piece of wood. This means you can pull the strands towards you as you plait, so you can keep an even tension on the plaiting. Here I’ve used a nail banged into a piece of wood. Arrange the strips so that the shiny side of each strip is showing uppermost.
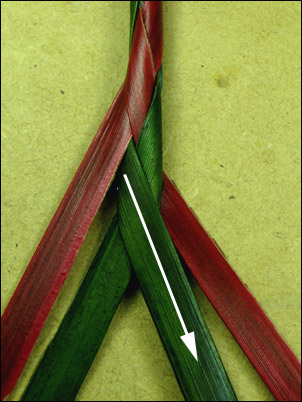
 I’ve used two strips of dyed green flax and two strips of dyed red flax for these illustrations to show the plaiting sequence more easily. If you are using two different colours, arrange the colours so that one colour is used for the two outside strips and the second colour is used for the two inside strips. To start plaiting, grasp the middle two green strips, and cross the left-hand one over the right-hand one, keeping the shiny side uppermost.
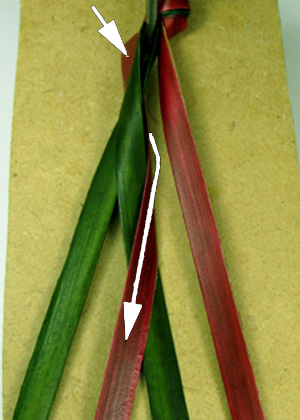 Then take the outside left-hand red strip, and bring it under the two green strips to the right of it, turning it so the shiny side of the flax will be showing on the underneath of the cord. This means that the dull side of the strip is showing at the front. Bring this strip around and over one green strip next to it on the left. The shiny side of this strip should now be showing.
 Go to the right hand side of the plait and take the outside red strip to the left under the next two strips, (one is red and one is green), keeping the shiny side of the flax on the outside of the cord so that the dull side shows on the front. Bring this strip around and over the one red strip to the right of it so that the shiny side of this strip is now showing. Note that the two green strips are now on the outside and the two red strips are in the middle.
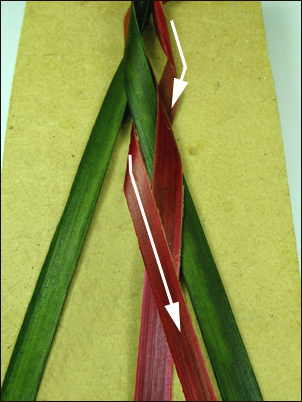
These last two steps are now repeated. Note that the first movement of crossing the centre two strips, just before these two steps, is a starting movement only, and is not included in the continuing sequence.
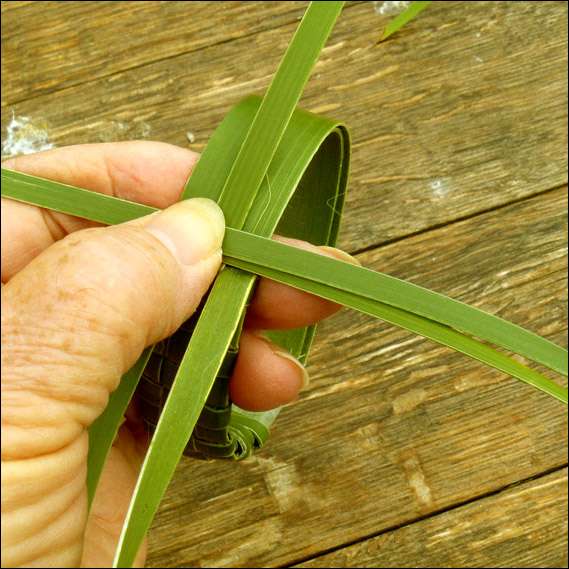
 To continue, go back to the left hand side and take the outside green strip under the two red strips and then turn it back over one red strip, making sure you keep the shiny side of the flax on the outside of the cord as you do this.
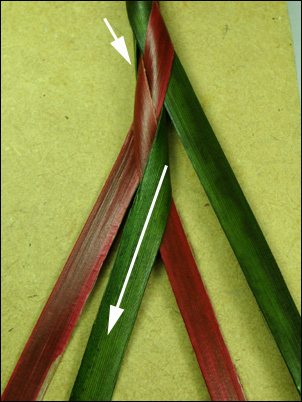
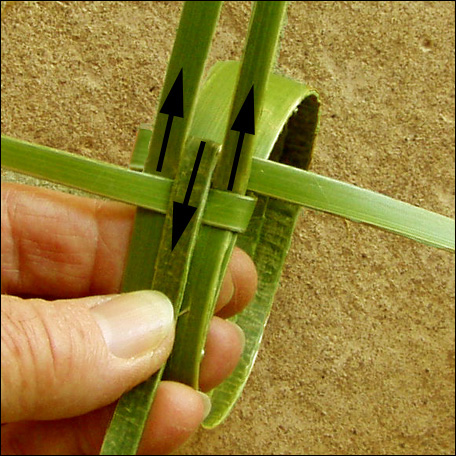
 Now go the right hand side and take the outside green strip under two strips, (one is green and one is red), and then turn it back over one green strip. Pull the strips out each side and up so that the plaiting tightens up and the tubular shape and pattern of the cord starts showing. Continue plaiting, pulling the plait up tightly and evenly as you go.
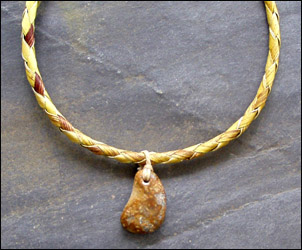
 The nice thing about weaving a four-plait cord with two different colours is that the colours spiral around the cord, giving it a candy-stripe effect, which I find very attractive.
The plait made with flax fibre, or muka, shown on the left in the photo toward the top of this post, is plaited in the same way as the one made with strips but because each set of fibre strands that is being plaited is round rather than flat like a strip, it does have a different look to it.
 The necklet at the top of this post has a copper clasp. This is made by winding copper wire tightly around each end of the cord and shaping the wire into a hook on one end and an eye on the other end. To ensure the wite stayed in place, I used a little bit of glue under the wire.
Modification Jan 2010
I have replaced the original illustrations for this post, where I used four flax strips of the same colour, with illustrations using flax strips of two different colours. This is a result of a participant in one of my recent workshops finding it much easier to remember the plaiting sequence when we used two different colours for the plaiting strips.
Modification June 2021
I have added arrows to the illustrations for this technique, to make it easier to see which strip is being moved at each step.
© Ali Brown 2008. Last updated 2021.
Scroll down to leave a new comment or view recent comments.
Alternatively, check out earlier comments received on this blog post when it was hosted on my original website.
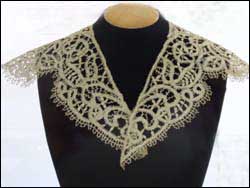 What do forty-two kilometres of rope used in Nelson’s sailing ship, HMS Victory, a traditional Māori feather cloak, and the Victorian lace collar in the photo all have in common? They’re all made with strong, thin fibres that have been stripped from the leaves of the New Zealand flax plant. For hundreds of years, Māori used this fibre to make clothes, ropes, fishing nets and bird snares. Later, European immigrants developed large-scale rope manufacturing using a stripping machine that could process up to 250 kilograms of fibre a day.
 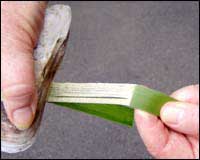 Thread stripped from the leaf by hand is a much finer thread than thread stripped by machine. In traditional hand-stripping, a mussel shell is scraped along the length of a strip of flax, forcing the green fleshy outer layer of the leaf down through and away from the fibres, and leaving the fibres clean and clearly separated into individual threads. With machine stripping, the whole leaf is put into a revolving metal drum where wooden paddles beat the green pulp off the fibre. The pulped leaves are then put through a scrutching machine which dresses the fibre by removing the short fibres and cleaning off any remaining particles. However this process doesn’t clean or separate the fibres completely, so machine-made flax thread is thicker and rougher.
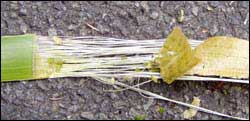 The difference between fibres produced by hand and those produced by machine became very clear to me while I was preparing a talk on flax weaving for the 2008 conference of the
 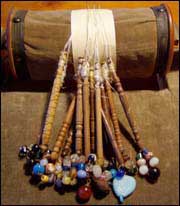 When making rope or a traditional Māori feather cloak, or in the threads traditionally used for lace-making, the strands of fibre are invariably twisted together to make a thread. This makes the thread stronger and allows new fibres to be twisted in, so that the thread can be much longer than the original fibres. However, after examining Mrs Williams’ work, and experimenting with flax fibre myself, it became clear that Mrs Williams knew what she was doing. Twisted flax fibre is just too thick for lace-making in the traditional method, so her four-strand fibres were limited to the length of the leaves from a flax plant.
 Have you ever noticed that dyed flax often loses some of the natural sheen that can be seen on freshly harvested flax, leaving the colour flat and dull? It seems that the sheen comes from a layer of wax on the surface of the flax leaf. Apparently, all plant leaves have at least some wax on the surface of their leaves — mainly to waterproof them but also to provide a degree of protection from the sun’s ultraviolet rays, and from disease and grazing by insects.
 For the long list of people who have asked to be notified as soon as the booklet comes out, and have been waiting patiently, in many cases for several months, I must apologise once again. There are several reasons for the delay. Firstly, I’ve been including more and more weaving designs for flowers, and improving the photography and layout as I’ve gone along. Secondly, I recently moved from my well-established lifestyle block in the country to the city, and the move has taken up quite some time. Thirdly, having finished working on the instructions, it seemed silly to release the booklet without showing at least some examples of what can be done with the flax flowers once they’ve been woven.
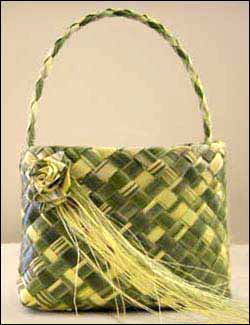 The top edge of a kete can be finished in many different ways and the one you choose will depend on the look you’d like for your kete. In this little kete I wanted undyed variegated flax to be the main feature, and this already made the design a bit busy, so I used a simple straight edge on the top. (Incidentally, although the colour of variegated flax will fade, the variations in tone will still be visible when it is faded).
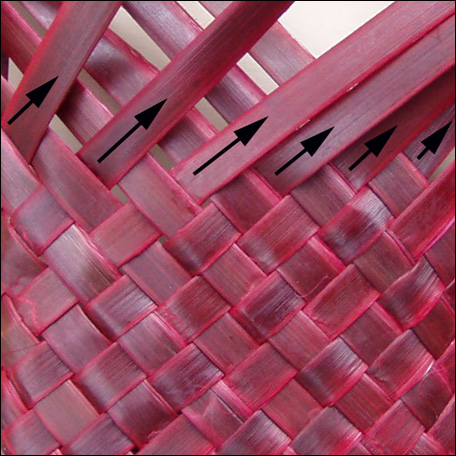
 Weave the kete to the height you want it. Start the straight edge by folding one of the top strips that is pointing up to the right, back on itself, so that it is lying pointing downwards to the left. Miss one strip along the top edge and take the next strip pointing up to the right, pull it out from underneath the strip it is lying under and fold it back down across the same strip that the first one is folded down on. The strip that is pointing up to the left is now lying alongside the fold of the second strip that was folded back, over the strip that was missed and alongside the fold of the first strip that was folded back.
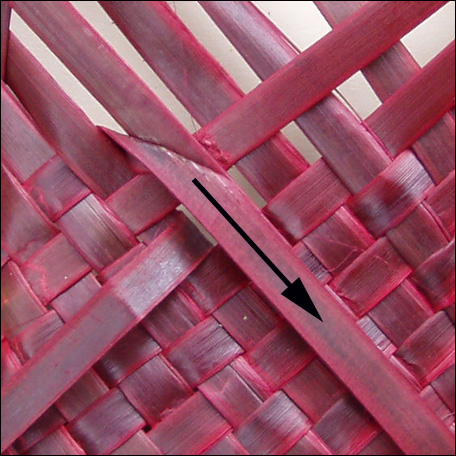
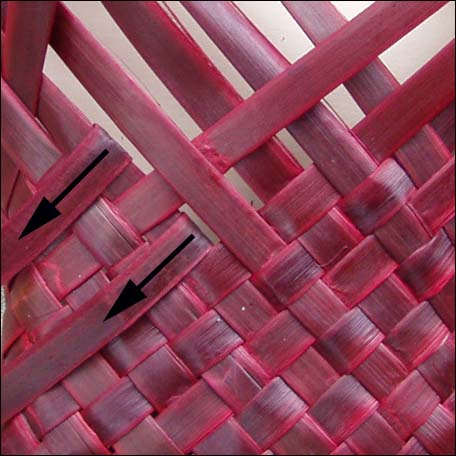
 Bring the first strip, that was folded back, forward again and then bend it downwards at an angle to the right so that it lies over the top of the strip pointing up to the left. Bring the second strip, that was folded back, up again to lock this strip in place. You will repeat this set of steps right around the top.
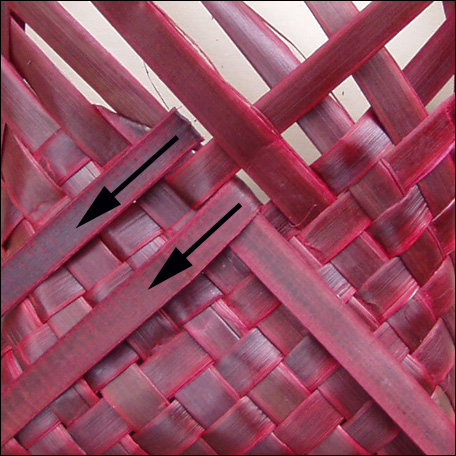
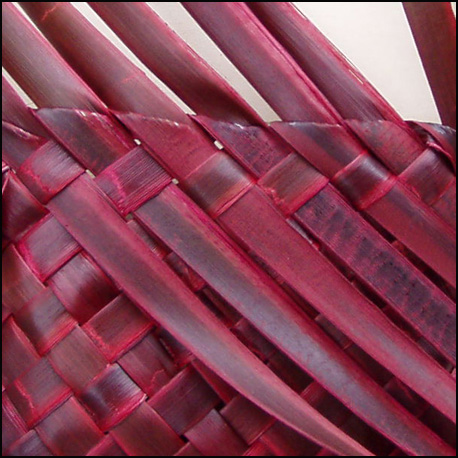 Start the next set of steps by folding back the next top strip, and the third one along, as in the first step. Continue with the rest of the steps. Then repeat this set of steps until you come back to the beginning. The first part of the straight edge is now finished. The strips you have folded down have formed a straight edge around the kete and there will be strips pointing up to the left all the way around.
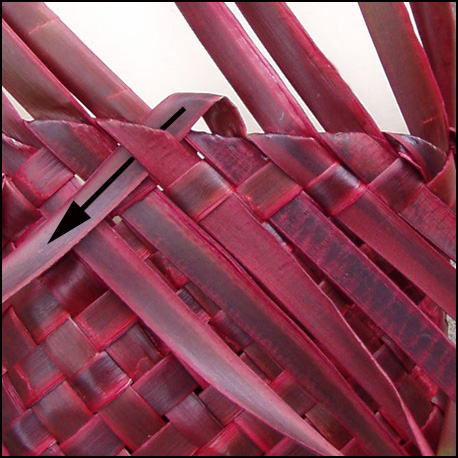
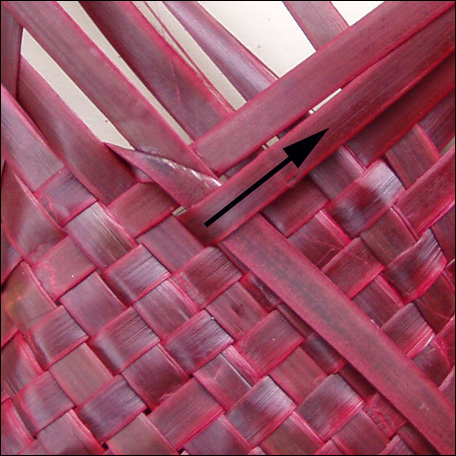
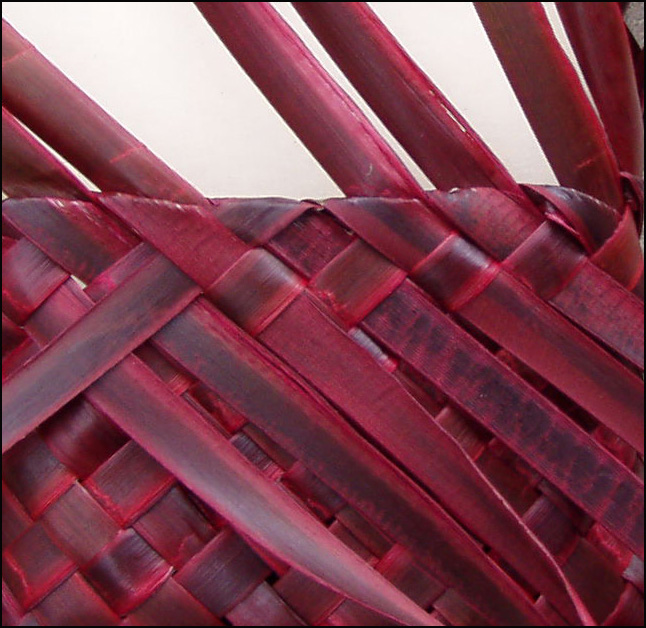 The strips lying up to the left now need to be woven back down into the body of the kete. Take one of these strips and fold it down to the left, over the fold of the strip in front of it, and then thread it underneath the strip next to this one. Thread the strip down one more time through the next available strip.
 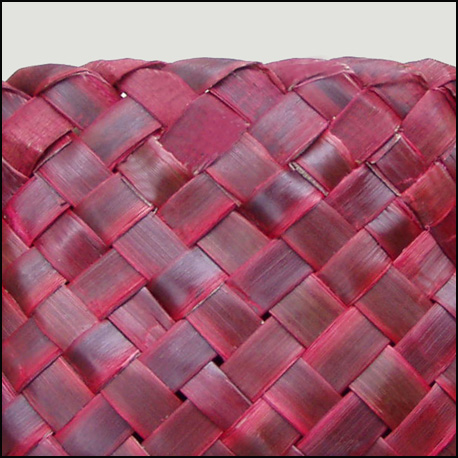 Complete this all the way around the top of the kete. Finish by simply cutting the ends off, or embellish the kete by fringing the ends or plaiting them around the kete.
 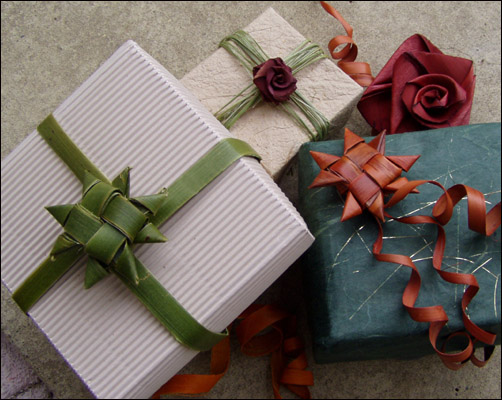 Have fun with gift wrapping by using flax for decoration on your gifts! Shredded flax is great for ties, flax stars with curled flax ribbons are an ideal decoration for Christmas gifts and, of course, flax flowers are an appealing addition to any gift.
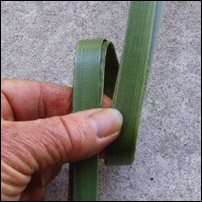 To make a star with flax, you will need four strips of flax about one centimetre wide and thirty centimetres long. If you want to tie the ends around a parcel, once you’ve made the star, you’ll need to make the strips as long as possible. Soften the strips by scraping a knife along the underside (dull side) of the strips and then lay them together in pairs and use the pairs as if they were one strip for now. Wrap the first strip around your fingers and keep a loop at the top. Hold this in place with your thumb or it can be held in place with a peg.
 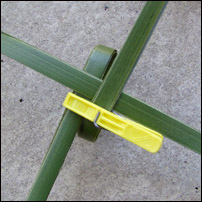 Place the second pair of strips horizontally across in front of the looped strip and behind the strip that is pointing upwards.
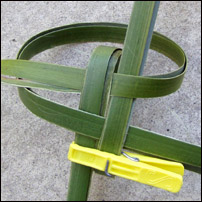 Take the end of the strip that is pointing out to the left back around behind the loop, across in front of the strip pointing upwards and then poke it through the loop.
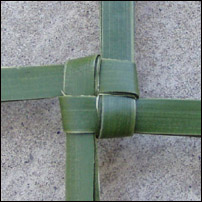 Tighten the weaving by pulling each set of ends in the direction they are pointing so that there is now a woven square.
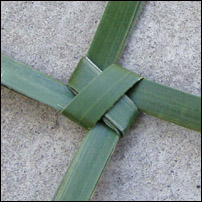 Turn the woven square over and hold the weaving so that the strip on top of the two in the middle of the square is lying with the top on the right and the bottom on the left.
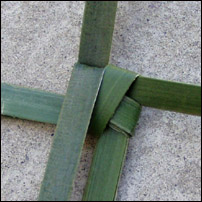 Take one strip of the two strips lying together at the top and fold it down on itself.
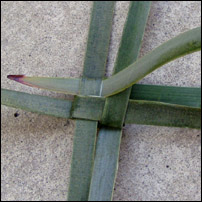 Continue folding down one strip on itself in an anti-clockwise direction around the square. Secure all these by poking the last strip under the first strip that was folded down. The woven square now has two strips coming out from each side.
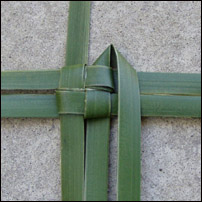 Take the right strip of the two at the top and fold it behind and across to the right and then forward and down.
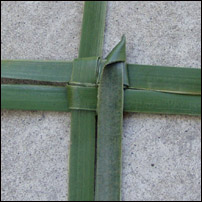 Fold the strip back on itself to create a point and secure this by poking the end back down underneath the strip where it came out from, making sure you don’t pull too far so that the point is pulled right through.
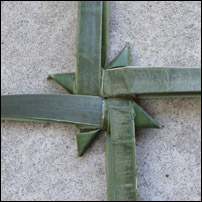 Repeat this and make a point on the other three right-hand strips.
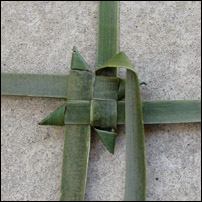 Turn the star over and make points on the other four strips, only this time fold the strip forward and across and then down, rather than behind and across as before.
 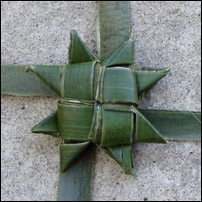 There will now be four ends coming out from each side of the star. Cut the ends off closely and the star is ready to attach to the gift. If you want to use the ends to tie the star to a parcel, cut off only one set of ends.
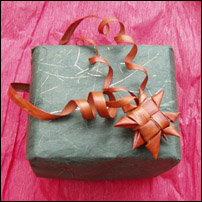 To curl flax, wind it tightly around a dowel or similar while it is still fresh and green, or still wet after being dyed. Then leave it to dry. The flax will then be set in place in curls.
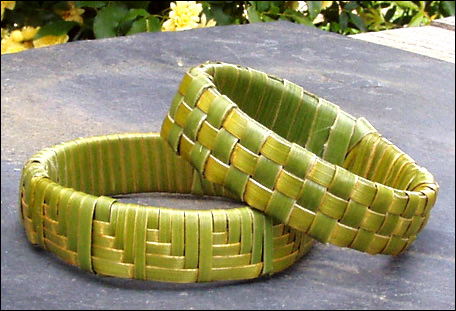 I ran my first flax weaving workshop for “at-risk” teenagers last weekend, and was a little nervous before the workshop, because I wasn’t sure that all the participants were coming to the workshop entirely of their own free will, and if they weren’t it might have made for an uneasy atmosphere. I needn’t have worried. It went off well and all the participants appeared to enjoy themselves.
 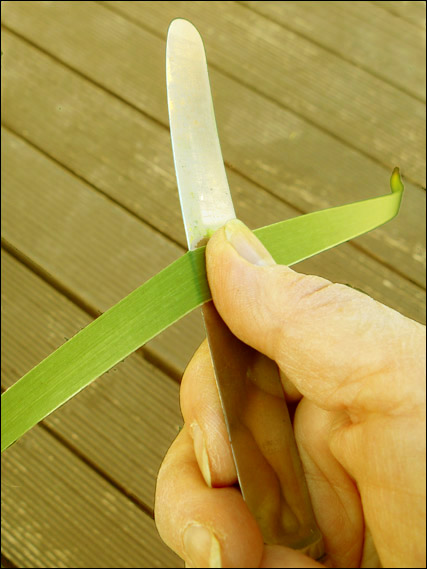 The wristbands are made with a strip of flax which is long enough to go around a wrist four times. Prepare this strip about 2 cm wide and as long as it can go without using the thicker white butt end of the strip. Soften the strip before using it by placing the blunt edge of a knife against the dull side of the flax strip (the underside of the leaf) about halfway along the length of the strip. Hold the strip against the knife with your thumb, and pull the strip through on about a 90 degree angle to the knife. Scrape the flax in each direction, pulling to the end of the strip each way.
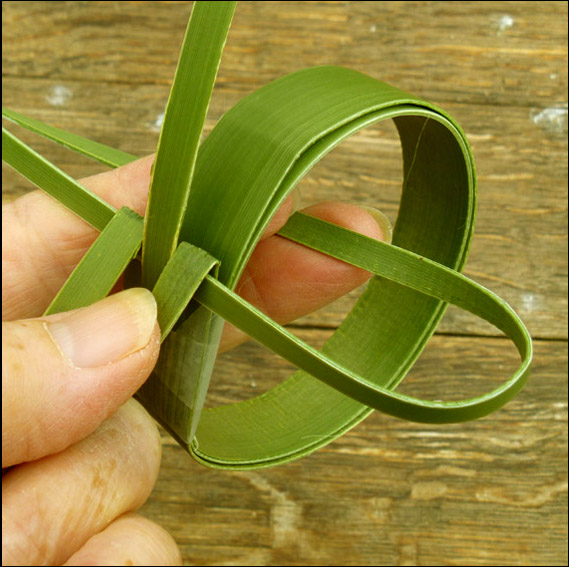
 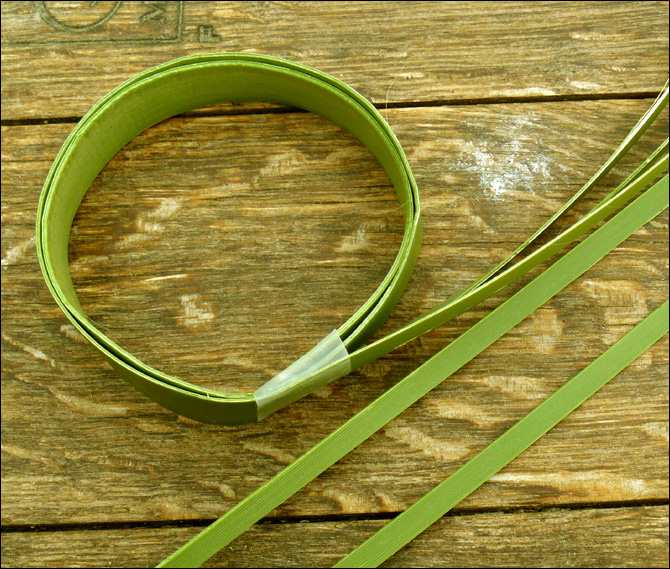 Wind the cut end of the strip around twice into a circle that is just big enough to fit over a hand. Secure the strip at this point with some tape. Split the free end into strips of an even width and make two extra strips that are the same width as these strips. These will be used to weave through the three strips of the main wristband.
 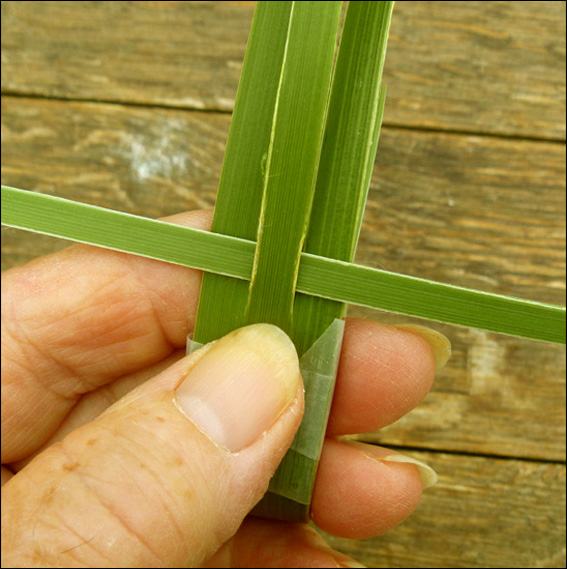 The simple wristband pictured here shows the circular strip split into three strips of the same width, with a separate weaving strip of the same width laid across them, going over the outer strips and underneath the middle one. Take one of the narrower strips and hold it with the thicker end out to the left. Position it under the middle strip of the three strips on the wristband. Leave about 10 cm poking out to the left and with the long length of the strip poking out to the right.
 As shown on the left, fold back the two outer strips over the top of the weaving strip, then hold them down with your thumb. As shown on the right, pass the end of the weaving strip through the middle of the wristband.
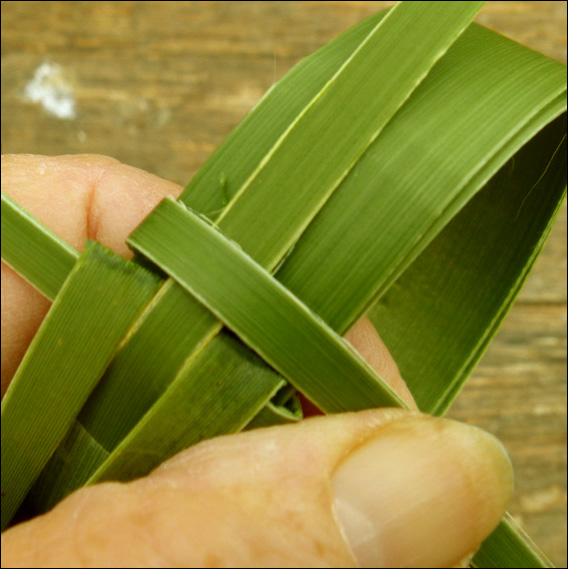
 As shown on the left, bring the weaving strip back around to the front and lay it across the top again, over the middle strip. As shown on the right, fold the two outer strips forward over the weaving strip, which is the strip pointing out to the right, and then fold the middle strip back, and hold it down with your thumb. (The end of the strip pointing out to the left is the start of the weaving strip and is not being used for weaving.)
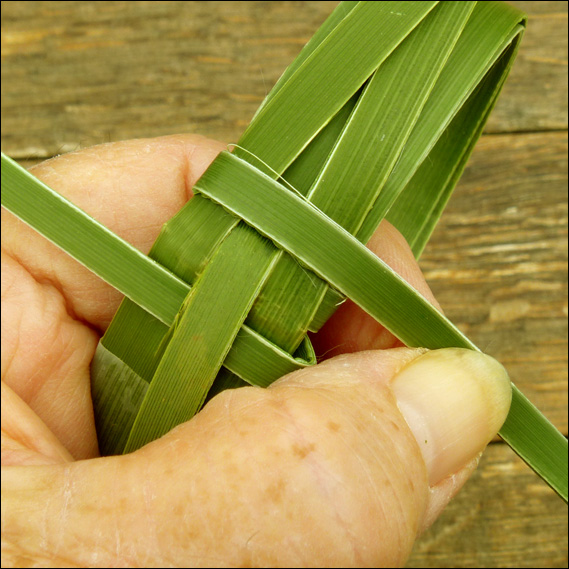
 Continue taking the weaving strip through the middle of the wristband and bringing it around over the top, while moving the central strips back and forwards. When the weaving strip gets short, lay a new strip over the top of the first strip and then use the new strip for weaving.
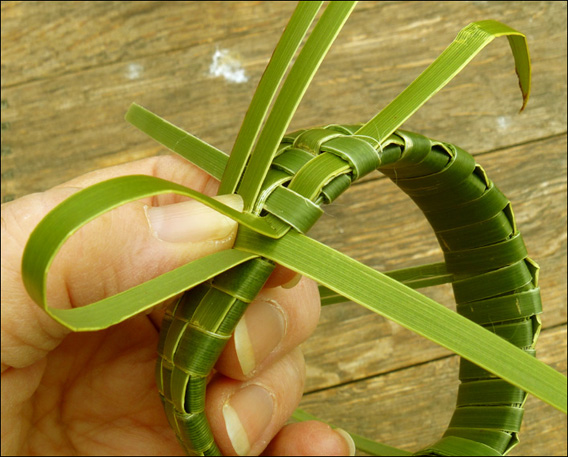 When the strips have been woven all the way around, weave the ends of the strips into the start of the wristband. Thread any other ends through the inside of the wristband and cut them off. If the wristband is not quite circular, push it down over a glass or jar until it fits tightly. This will help it dry into a circular shape.
 People regularly ask me if it’s possible to take flaxworks into other countries and the short answer is ‘yes’, although I recommend that flaxworks are declared as you go through customs.
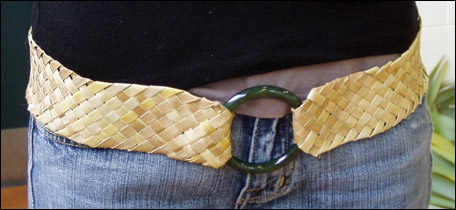 Weaving a flax belt is reasonably straightforward — a first-time weaver completed a belt on the second day of a workshop I tutored last weekend. Using the same basic pattern, it would be easy enough to add your own modifications and create a unique item.
 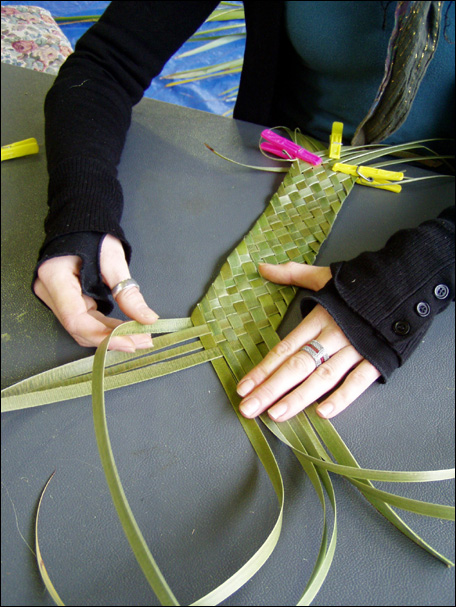 To make the belt, use flax strips about .8 cm wide. Prepare twenty strips (ten more if the flax you are using is short in length) as extra strips will be added in when the ends of the original strips are nearly reached. Start by twining ten strips together in a row and then weaving up. Fold the strips over at the end of the rows instead of twisting them. This makes a neat edge although both sides of the flax will show in stages along the belt’s length. Add a new strip when there is about 10cm left of the old one. Weave the new strip along with the old one and then continue to weave with the new one as the old one runs out. Weave the length you want for your belt taking into account the space that the bangle will take up.
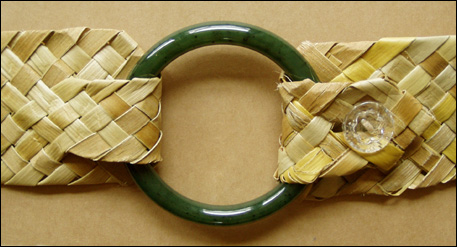 To include the bangle at the end, narrow the weaving by folding two strips each side back into the previous weaving and continue weaving the narrower strip for about three rows. Put the bangle over this and fold the narrow woven piece back along the inside of the belt, threading all the ends for about 5-8cm into the weaving on the inside of the belt — long enough to hold the bangle securely when the belt’s worn. The other end is narrowed in the same way as this end and a buttonhole included after about two rows of weaving. Weave two more rows then fold and thread all the strips back into the narrow strip of weaving to secure the ends. Sew a button onto the inside of the belt.
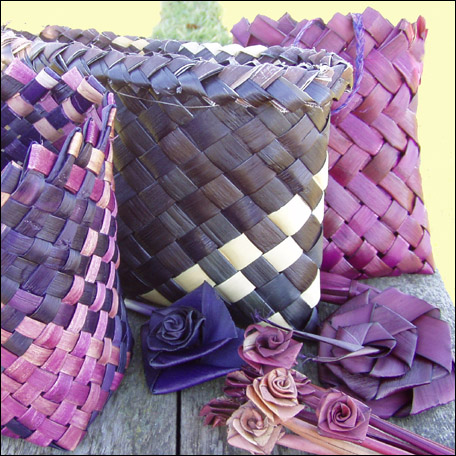 The format of my two-day workshops has been evolving as I’ve learned more about what first-time weavers are ready to learn on the second day of a two-day workshop. I tutored a two-day workshop at the Christchurch Arts Centre last weekend and, for the first time, I included a session on dyeing flax. Naturally enough, people want to be able to weave with the flax once they have dyed it, and they’re often keen to try out traditional dyed weaving that is geometrically patterned. Unfortunately this requires a construction technique that is perhaps a little too complex to tackle for people who are just beginning to weave — and so to answer the question of “What can I do with the flax now that I’ve dyed it?”, I showed them how the different colours could be mixed simply and semi-randomly in their weaving for interesting effects.
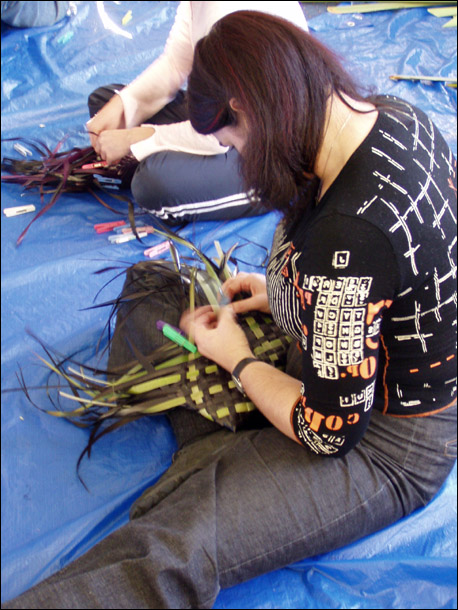 This worked out well. One person added some undyed strips to mostly black strips for a striking stripe feature in a simple kete. Another, using one colour for the warp strips and a second colour for the weft strips, wove a four-cornered container. Because of the four corners, this placing of colour produces broad blocks of the same colour as the corners are woven and then a combination of a checkerboard and broad blocks of colour as the sides are woven. In the two-cornered kete, this placing of separate colours in the warp and weft produces a complete checkerboard pattern.
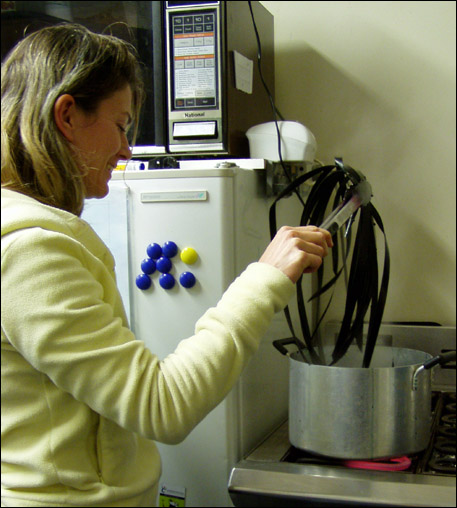 Teri dyes were used for the dyeing and the softened flax strips were dyed while they were still fresh and green — although the colour of the dyed flax will be more true to the original colour when using this particular dye if the flax is boiled first. Flax can be also dyed after it has already been woven but the weaving will shrink slightly as it dries so this can result in areas where the full dye colour hasn’t reached the flax at the cross-over of the strips — not such a good look and a method I don’t use for this reason.