7 December 2020
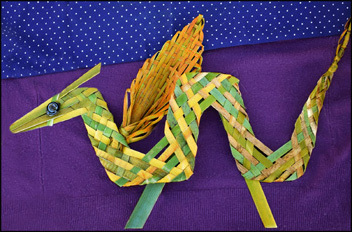
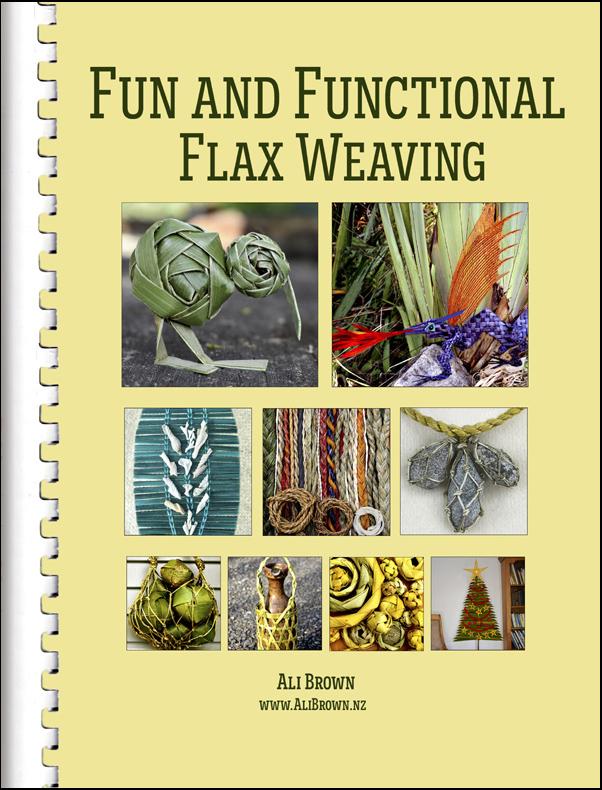 The book I’ve been writing, Fun and Functional Flax Weaving, is now available for sale through the online Shop page of my website. From delicate cords for jewellery to rugged hefty thick ropes used in outdoor art, from useful bottle carriers and decorative flask holders to toys for children and pets, window blinds and table runners, mobiles and fiery dragons, this book shows how basic weaving, knotting and plaiting techniques can be used for the creation of any number of useful items that have wide appeal.
 Weavers of all levels will find something to spark their interest. Even though many projects can be achieved by those with little or no weaving experience, there are also projects which require previous weaving knowledge — for those who want to extend their weaving repertoire or who like a challenge.
 Different techniques are used in each project and so it’s also suitable for a course book — as well as for individual weavers and groups. Buyers of my previous books have commented positively on their easy-to-follow, step-by-step illustrations beside the written instructions. You can see a link to these comments under each blog post I’ve written when I’ve published a book. More illustrations from the book are shown on the web page About the book Fun and Functional Flax Weaving. The samples in the book are woven with New Zealand flax but any natural or manufactured material that can be made into long thin strips can be used for most projects, including palm leaves, strapping, bark and paper.
 If you buy the book, do post a comment below if you can see how it might be improved, or post a question if any of the instructions are not entirely clear. Also if you have any photos of your weaving based on projects from this book, I’d love to see them.
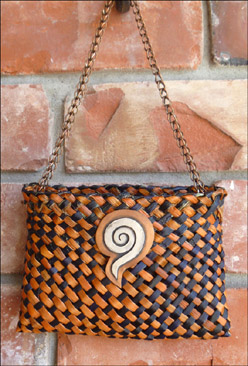
 The book can be purchased directly from me, along with my other books, Weaving Flowers from New Zealand Flax, Weaving Baskets, Backpacks, Boxes and Other Projects and Weaving a Large Container from New Zealand Flax, either singly or in a set of 3 or 4 of the books, (which incidentally makes for savings on postage charges), from my online shop. I do hope that people find this book useful and even inspiring. Happy weaving!
© Ali Brown 2020. Updated 2021.
Scroll down to leave a new comment or view recent comments.
Also, check out earlier comments received on this blog post when it was hosted on my original website.
 Traditionally flax weaving is woven on the diagonal rather than vertically and horizontally, as in many other weaving traditional weaving styles and I’ve noticed that new flax weavers often struggle when they’re trying to get tidy, even diagonal weaving. One of the trickier things for a new weaver is how to work out if the weaving is all at the same level — or how to find the ara or path of the weaving. As weaving is completed row by row, as in knitting for example, working this out is a basic skill that’s essential to master if you want to progress in weaving. It’s also essential if the weaver wants to achieve a straight edge at the top of the weaving, as illustrated in the kete here. Steps on how to achieve even, diagonal weaving are illustrated here using red and white arrows — the red arrows show the current movement and the white arrows show previous movements — as well as steps to take if a particular strip is too low or too high.
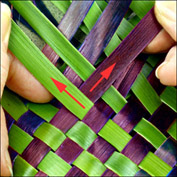 Select two strips so that the one pointing to the right (the purple one) is under the one pointing to the left (the green one). Pull the strips up gently but firmly to firm up and tension the weaving.
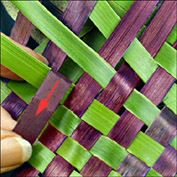 Once the strips appear to be tensioned firmly, fold the purple strip that is pointing to the right back down to the left. This is the height that all the strips will be matched to.
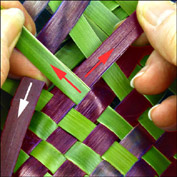 Move on to the next set of two strips, one green and one purple and pull them up gently but firmly as before to tension them. (The white arrow shows the previous strip that was folded back.)
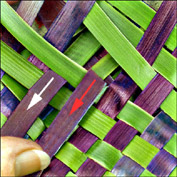 Lay the strip pointing to the right back down, following the red arrow, checking that it’s at the same height as the previous strip folded back. Carry on doing this all the way around the top of the basket.
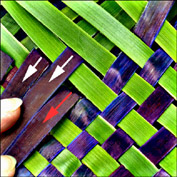 If a strip folds down lower than the others, as the lower purple one has here, then it will need to be woven up to reach the same height as the others.
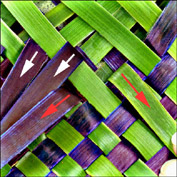 To weave it up to the right height, fold back the green strip from the right that is the second green strip above the strips that has folded down lower than the others.
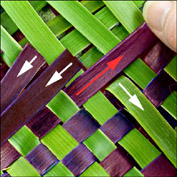 Bring the purple strip that was folded back forward again, so that it’s pointing up to the right.
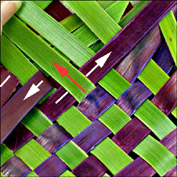 Bring the right-hand green strip over this purple strip so that it’s pointing up to the left. The two strips are now up to the same height of weaving as the rest of the weaving.
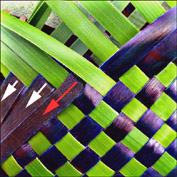 When the purple strip is folded back down over the green strip, it is now at the same height as the others.
 If the strip folds down higher than the others, as this purple one has here, which is folded back over two green strips instead of one, then this bit of weaving will need to be undone and woven again.
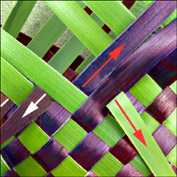 Bring the purple strip forward again and then pull the green strip pointing to the left back down out of the way.
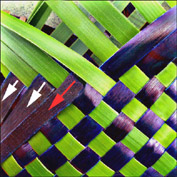 The purple strip can now be folded back down on the correct green strip and is at the same height as the other top purple strips. You can now carry on weaving, making sure you are weaving row by row around the item, and then moving up to start a new row. The weaving used in these diagrams is one over, one under weaving and is applicable only to this style.
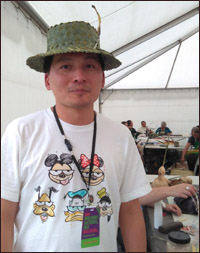 The 2019 Weavers National Hui, held over four days at Labour weekend at Ngā Hau e Whā National marae in Ōtautahi/Christchurch was a terrific success in my view. Thanks go to the organising group including Ranui Ngarimu and Paula Rigby and the many obliging volunteers, who put together a weekend of weaving, knowledge sharing, forums and visits to sites of interest. The delicious food served up by Te Rūnanga o Ngā Maata Waka completed the enjoyable experience.
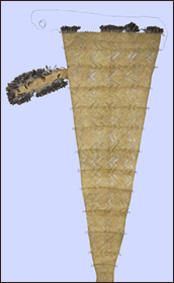 One of the highlights was the presentation of two groups studying Te Ra: The Māori sail, which is the only known Māori sail left in existence and is held by the British Museum. One group is studying the sail from a practical weaver’s approach, working out the weaving techniques used to weave Te Ra. With this knowledge they hope to recreate a traditional sail. At the hui, members of the group were weaving samples using very fine weaving strips. The techniques include open-weave sections that allow the wind through the sails. Follow their progress on
 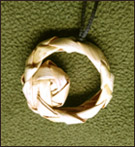 Several people commented on the koru pendant I designed a few years ago and was wearing, so I showed them how it’s made. One kuia was interested to weave this pendant as she was weaving items for tourists and thought the pendant was small and light and is easy to carry in luggage. If you’d like to make one yourself, check out my blog post
  This year, the exhibition at National Hui celebrated the weaver and kete — a kete made by the attendee, or one brought, gifted or inherited. The stunning display of kete in this exhibition showcased the wide variety of designs, patterns and weaving techniques that encompass the weaving of the past and present. I don’t have permission to use images of the ketes in the exhibition, apart from this one which is the first kete whakairo, or patterned kete, I wove many years ago. The pattern is Koeaea and represents whitebait swimming.
 I’m pleased to say that my online instructions for Weaving a Flower from New Zealand flax are now available on this website in te reo Māori as
 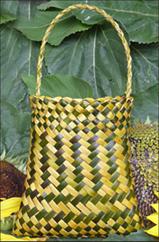 I’ve learned quite a lot of Māori words through my work with flax weaving over the years and found that the combination of my love of weaving with my learning of te reo Māori gives a synergy to my ability to learn. I’m glad to say that I can now string some sentences together that relate to weaving. For example, “E hia nga whenu?” when I want to know the number of strips for weaving a certain piece, or “He aha te tae o te waitae?” when I want to know the colour of a dye. By the way, I didn’t record the name of the dye I used in this kete whakairo, which I do these days as it’s a very useful source of information.
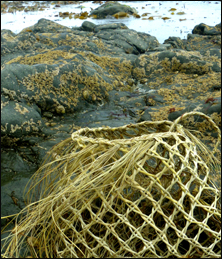 At my last flax weaving workshop, in addition to showing people how to weave small baskets and large containers, I invited more experienced weavers to learn how to weave an open-weave basket — kupenga kete — and four people took up the offer. I’d woven my kupenga kete a few years ago and the questions Beryl, Kath, Gill and Oz asked while weaving their baskets reminded me of the things that need to be worked out as the basket is woven and I thought I’d share this information. When gathering flax for this basket, choose firm flax as the strips need to be quite firm to retain the shape of the open weave in the basket. The basket I’m using to illustrate this post is woven with 64 strips that are 0.5 cm wide, with fine fibre, or muka ends. The number of strips required needs to be divisable by 8.
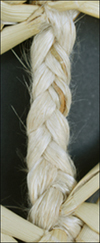 The basket is started by adding two sets of two strips each side, each time i.e. 8 strips altogether, into the plait at set intervals in order to create the diamond pattern. It makes a difference how fat the plait is as to how often the strips are added in. If the fibre ends have been scraped down to fine fibre, which makes a finer plait, then more plaiting is required between each set of strips. If the fibre ends still retain some of the green fleshy part of the flax, then the plait may be quite fat, and the sets of strips will need to be added more frequently. This illustration shows six rows of plaiting between each addition of strips. (As the illustration is from a completed dried basket it is showing already-woven strips rather than green strips, as yours will be, when you add them to the plait.)
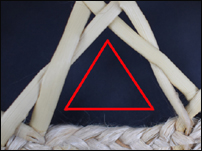 To check if the length of plait in between each set of strips is right, hold up two strips from each set together at the top to show the shape of the diamond. If the strips are too far apart, the diamond will be too big, so reduce the number of plaits between each set of strips addition.
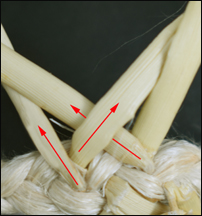 Once all of the strips are added in and the plait is tied off, then weave the sets of strips on one side to start the pattern. The strips from each set of four are firstly woven together by weaving the right strip over the left strip in both sets of two. Then weave the second strip over the third strip which sets them in the right place for the pattern. Peg in place and repeat for all the sets of strips on one side. The two strips left at each end are used to weave the corners.
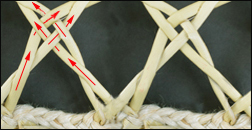 Cross the two strips (I always cross the strips in the same direction as it helps to keep the pattern looking well-made and attractive), and then take the right set of crossed strips from one set and the left set of crossed strips from the set on the right of it and weave the two sets of strips through each other in under/over — taki tahi — weave. Go to the next four strips and repeat this across to the end of the plait on this side. Look at the half diamonds that have been created along this first row and make sure they are basically the same size and shape. If they aren’t adjust the tension to make them as similar as possible.
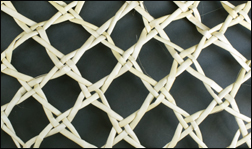 Repeat this crossing of two strips and then weaving four strips together across the side two more times and there will now be full diamond shapes created with the weaving. Peg in place and repeat on the other side. Fold both sides up together and then weave the corner together with the two strips left at the end of each side. Before weaving any higher, secure the ends of the plait inside the kete with a tie so that they lie flat and neatly along the inside of the plait.
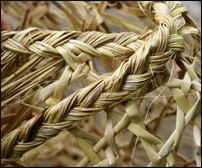 Once the sides are completed to the height you want, finish with the four weave crossing and peg the strips in place. Comb the ends out into fibre and plait these together for the top edge. To do this, I use a set of three narrow flax strips tied together to start the plait and then bring each bunch of fibres from the end of each strip into the plait as in French plaiting. See pages 78-82 in my
 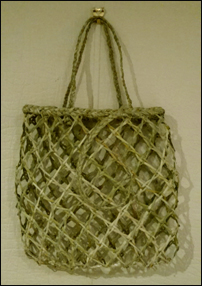 There are different ways to finish the plait. For example, the end of the plait can be threaded through to the inside of the rim and tied in place or the plait can be lengthened to make a decorative finish. The ends can be left on or cut off as in Gill’s kete illustrated here. It was good to see others weaving this basket as it highlighted the things to think about and observe in the weaving. I hope you find this useful when you weave your own kupenga kete, and do send me photos of your finished weaving. I’d love to see them and share them here.
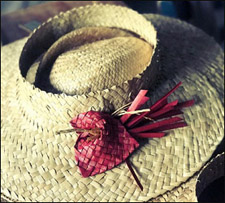 When I notify buyers of my books that their order has been sent, I ask them how they found out about the books. There are many answers to this question — people have heard about them through friends, weaving groups, schools or university courses and often, especially overseas buyers, people discover the books through internet searching. A number of people have also found them in their local library, take them out multiple times, and decide they must buy them!
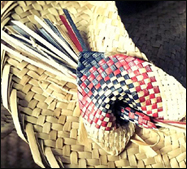 I recently sent my
  Hats, or pōtae, are fun to weave and this style is a good one for beginners to start with. To weave a crownless sun visor-style hat similar to Deborah’s lauhala one and like the one pictured here, you can use instructions from my
 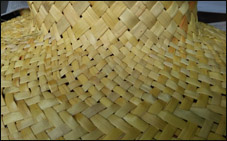 Now add in extra strips for the brim at the other edge of the cylinder. For this hat I split the strips to make a finer weave for the brim. I wove one row and then added 23 cm strips of the thinner .5 cm width, making 46 strips added altogether (the added strips are doubled over to use both ends). See pages 101 – 103 of the Basket book for instructions on how to add strips in. Weave a few rows for the brim — I wove a wider brim but it can be narrower than this — and then finish the edge of the brim off. The crown of this hat is a bit high and I suggest weaving 3 or 4 rows for the crown rather than the 5 rows that I wove.
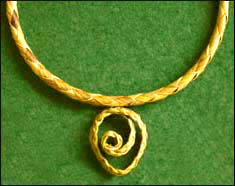 Crafting personal jewellery from natural objects is a universal and ancient pastime so it’s not surprising that people who work with New Zealand flax, harakeke, make jewellery as well as baskets, hats and other larger items. A variety of interesting jewellery pieces can be fashioned simply by plaiting four strips of flax into either an enclosed, rounded plait or an open curved plait and then shaping the plait into a necklet, earring, brooch or bracelet. For example, the pendant illustrated on the left shows the rounded plait being used to make a necklet and the curved plait being used to make a pendant shape to hang from the necklet.
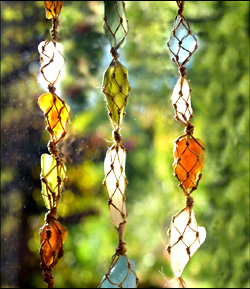
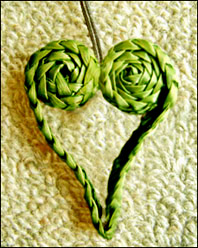 The curved version of this four-plait works well to make various shapes of pendants, like the two heart-shaped pendants illustrated here. The pendants are made by curling the plaited flax into a koru shape — a spiral shape based on the appearance of a new unfurling silver fern frond — at one end and then curling it up in the reverse direction the other end, leaving a single piece of plait in between them. The point of the heart is shaped by pinching together the single strip of flour-plait between the two koru shapes while the flax is still soft and shaping it into a curved point.
 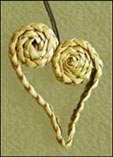 The heart shape is held together with a small stitch with thread in the centre. A waxed linen thread is added for hanging. The green pendant’s shape is a classic heart shape but I rather like the offset shape of the naturally-coloured pendant which is made by joining the two koru shapes so they are slightly offset from each other.
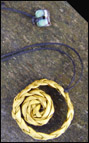 Illustrated on the left is a variation I made of the koru pendant. This design has a small koru in the centre which is encircled with a larger single row of curved four-plait. To complete the pendant, the ends are threaded through into the plaiting of the outside plait, by threading each end twice through into the plait pattern. This secures the outer encircling plait. A waxed linen thread with a loop at one end and a paua shell button at the other end is used for hanging the pendant.
 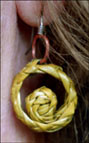 I also made a smaller version into earrings. To allow the earring to hang freely and on an angle which shows the pattern fully, the koru circlet needs a jump ring, or extra ring, between the circlet and the earring hook. Unfortunately I only made one of these earrings so have never worn this one as an earring, although I do wear the pendant regularly and have received favourable comments on it. (I must make that second earring sometime!)
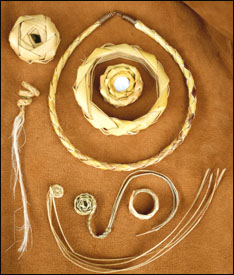 I’ve played around with a few different ideas for making jewellery with a four-plait, including enclosing a small shell or stone in the centre of the koru. The curved four-plait makes a nicely rounded bracelet, or a ring. A smaller version of the bracelet could be used for napkin rings, or with a few more layers, a toggle to hold a scarf if the hole in the centre is a bit larger than the one illustrated here. I like long tails on the koru but haven’t yet found any practical jewellery use for this style, although I can see it being used in other ways. Do you have any more ideas for koru jewellery? Or other sorts of woven jewellery? I’d love to see them.
 I recently updated the
  It’s not always easy to earn a full living as an artist or craftsperson, and having a detailed documentary record of your work, including your experience and specific skills, will invariably stand you in good stead when offering your services as a tutor, writer, or seller of craftworks. It’s also necessary when applying for funding to be able to show your art/craft history and experience. One way to do this is to have a separate CV for your art/craft work, apart from the CV you use to find employment. For example,
  Back in the early 2000s, I wanted to teach weaving in a local polytech and had a craft CV prepared to help me get a job there. Having worked in the employment industry, I knew it was important to choose a CV writer who understands that making a living from your art or craft is a viable career option and doesn’t take the view that you should aim for a ‘real job’. I chose
 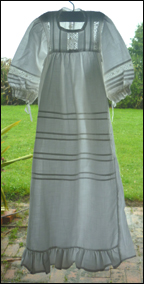 Apart from documenting your work for income-earning purposes, it can be a rewarding and informative exercise to revisit your own work over the years, and my children have also been interested to learn about my craft history. (The photos illustrate one of my early craft projects — a baby gown I made in the 1980s when my children were born, along with a close up of the bobbin lacework I wove for it.) Whenever you work on a CV, you are exploring your own craft whakapapa, or craft history, which gives you a sense of where you picked up your various skills and how they may be influencing the work you do now. Also, the knowledge and recognition of your own experience and abilities can instill a greater confidence in the approach you take to earning an income as a craftsperson, and the documentation of your work gives you a factual and authentic base to work from.
  When I hold workshops, people regularly ask me where I learnt flax weaving, or how I got into it. Although I can pinpoint when I first wove with flax to the late 1990s, and still have the first little kete I wove, (I didn’t know at the time that traditionally your first piece of weaving is given away), after remembering all the various types of craft work I have done over the years, I realise there is a much longer history that has influenced, and continues to influence, my work.
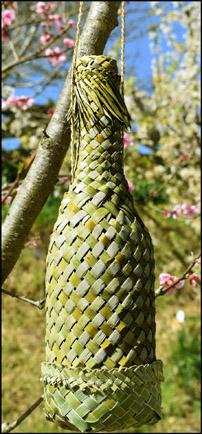
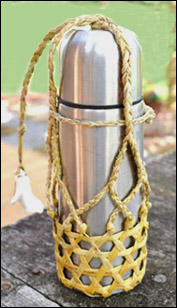 When I completed weaving a visor hat I was left with quite a few ends of prepared strips that I didn’t want to waste. They were long enough to use for a small project so I thought I’d weave a water bottle holder with them. I started with hexagonal weaving but as the strips weren’t long enough to reach all the way up the bottle I carried on with plaiting, joining the plaits as they lengthened, ending with three plaits at the top. Before starting the plaits, I secured the weaving by tying overhand knots with each set of two strips at the point where the strips became too short for further hexagonal weaving.
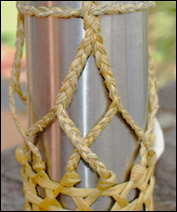 I shredded the ends of the knots and started plaiting each set, adding in shreds as required to keep the plaits reasonably even. As the plaiting progressed, I positioned them diagonally across each other and joined each alternate plait together to make one plait. I repeated this further up and ended up with three plaits at the rim of the bottle. It wasn’t necessary to join the plaits together as they grew longer, but I was in an experimental mood, and felt like trying out this idea.
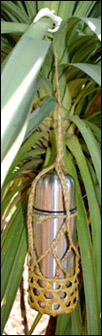 It worked fine and having just three plaits at the top also makes it easy to take the top off the bottle, although I did have to add the extra horizontal plait around the point where the three plaits start to ensure that the plaits sat at an equal distance from each other around the rim of the bottle. I extended the three plaits and then joined them into one plait over the lid of the bottle, plaited this a bit longer and added a loop in the form of a piece of water-smoothed shell. This makes a handy toggle for carrying the water bottle as well as hanging it up in a tree where the breezes blowing around the tree keep the contents cool. This was a fun exercise and although it’s not the neatest item I’ve ever made, it’s a useful piece of kit.
 Hexagonal weaving is fun to weave and is well-suited to this project as it’s easy to move from the horizontal weaving of the base to the vertical weaving of the sides. Next time I’ll use longer strips and use hexagonal weaving for all of the holder.