29 March 2019
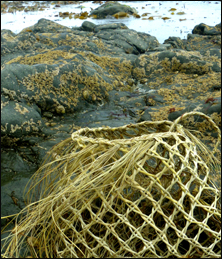 At my last flax weaving workshop, in addition to showing people how to weave small baskets and large containers, I invited more experienced weavers to learn how to weave an open-weave basket — kupenga kete — and four people took up the offer. I’d woven my kupenga kete a few years ago and the questions Beryl, Kath, Gill and Oz asked while weaving their baskets reminded me of the things that need to be worked out as the basket is woven and I thought I’d share this information. When gathering flax for this basket, choose firm flax as the strips need to be quite firm to retain the shape of the open weave in the basket. The basket I’m using to illustrate this post is woven with 64 strips that are 0.5 cm wide, with fine fibre, or muka ends. The number of strips required needs to be divisable by 8.
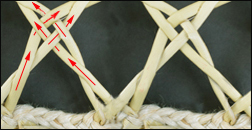
 The basket is started by adding two sets of two strips each side, each time i.e. 8 strips altogether, into the plait at set intervals in order to create the diamond pattern. It makes a difference how fat the plait is as to how often the strips are added in. If the fibre ends have been scraped down to fine fibre, which makes a finer plait, then more plaiting is required between each set of strips. If the fibre ends still retain some of the green fleshy part of the flax, then the plait may be quite fat, and the sets of strips will need to be added more frequently. This illustration shows six rows of plaiting between each addition of strips. (As the illustration is from a completed dried basket it is showing already-woven strips rather than green strips, as yours will be, when you add them to the plait.)
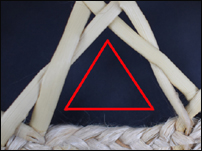 To check if the length of plait in between each set of strips is right, hold up two strips from each set together at the top to show the shape of the diamond. If the strips are too far apart, the diamond will be too big, so reduce the number of plaits between each set of strips addition.
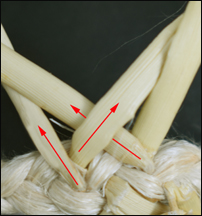 Once all of the strips are added in and the plait is tied off, then weave the sets of strips on one side to start the pattern. The strips from each set of four are firstly woven together by weaving the right strip over the left strip in both sets of two. Then weave the second strip over the third strip which sets them in the right place for the pattern. Peg in place and repeat for all the sets of strips on one side. The two strips left at each end are used to weave the corners.
 Cross the two strips (I always cross the strips in the same direction as it helps to keep the pattern looking well-made and attractive), and then take the right set of crossed strips from one set and the left set of crossed strips from the set on the right of it and weave the two sets of strips through each other in under/over — taki tahi — weave. Go to the next four strips and repeat this across to the end of the plait on this side. Look at the half diamonds that have been created along this first row and make sure they are basically the same size and shape. If they aren’t adjust the tension to make them as similar as possible.
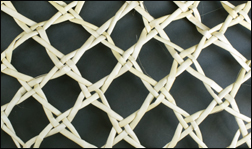 Repeat this crossing of two strips and then weaving four strips together across the side two more times and there will now be full diamond shapes created with the weaving. Peg in place and repeat on the other side. Fold both sides up together and then weave the corner together with the two strips left at the end of each side. Before weaving any higher, secure the ends of the plait inside the kete with a tie so that they lie flat and neatly along the inside of the plait.
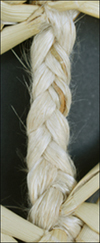
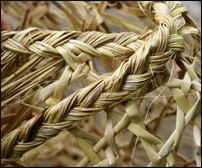 Once the sides are completed to the height you want, finish with the four weave crossing and peg the strips in place. Comb the ends out into fibre and plait these together for the top edge. To do this, I use a set of three narrow flax strips tied together to start the plait and then bring each bunch of fibres from the end of each strip into the plait as in French plaiting. See pages 78-82 in my book Weaving Baskets, Backpacks, Boxes and Other Projects for instructions on working this technique. Doing this plait quite tightly around the top can create a stunning sculptural piece.
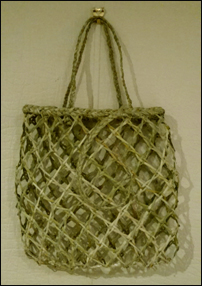 There are different ways to finish the plait. For example, the end of the plait can be threaded through to the inside of the rim and tied in place or the plait can be lengthened to make a decorative finish. The ends can be left on or cut off as in Gill’s kete illustrated here. It was good to see others weaving this basket as it highlighted the things to think about and observe in the weaving. I hope you find this useful when you weave your own kupenga kete, and do send me photos of your finished weaving. I’d love to see them and share them here.
© Ali Brown 2019.
Scroll down to leave a new comment or view recent comments.
Also, check out earlier comments received on this blog post when it was hosted on my original website.