25 October 2018
 When I notify buyers of my books that their order has been sent, I ask them how they found out about the books. There are many answers to this question — people have heard about them through friends, weaving groups, schools or university courses and often, especially overseas buyers, people discover the books through internet searching. A number of people have also found them in their local library, take them out multiple times, and decide they must buy them!
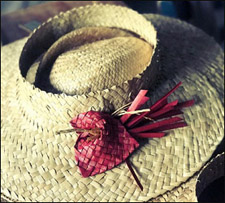
 I recently sent my book Weaving Flowers from New Zealand Flax, to Deborah Tuzon in Hawaii. She wrote, “I am a lauhala weaver who has not been able to weave for almost 8 years due to osteoarthritis in both my thumb joints. Surgery was done in both so now I am starting again. I used to make a flower that looks like an anthurium and I had lost my example. So I was looking online at different websites and I saw a flax flower on Pinterest that reminded me of it. It led me to your site. I have been making flowers for my crownless hats.” The flower Deborah has woven for her hats, which are illustrated in the stack of hats in the first photo on this page, is the flower I call an Arum Lily on pages 56 – 63 in my Flowers book.
 Hats, or pōtae, are fun to weave and this style is a good one for beginners to start with. To weave a crownless sun visor-style hat similar to Deborah’s lauhala one and like the one pictured here, you can use instructions from my book “Weaving Baskets, Backpacks, Boxes and Other Projects”, which, although they are instructions for weaving baskets, can be used for this style of hat too. Start by working out the size you want the crown of the hat to be. This is the measurement around the widest part of the head where the hat will sit. Use the instructions for weaving a cylinder on page 119 of the Basket book and add enough strips to the cylinder to make the size for your hat. For a size of 56 cm circumference, I used 68 strips of just over 1 cm wide (which dried to 1 cm wide) for the cylinder. Once the cylinder, or crown of the hat, is woven and joined, finish off one edge.
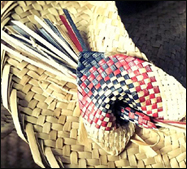
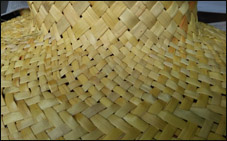 Now add in extra strips for the brim at the other edge of the cylinder. For this hat I split the strips to make a finer weave for the brim. I wove one row and then added 23 cm strips of the thinner .5 cm width, making 46 strips added altogether (the added strips are doubled over to use both ends). See pages 101 – 103 of the Basket book for instructions on how to add strips in. Weave a few rows for the brim — I wove a wider brim but it can be narrower than this — and then finish the edge of the brim off. The crown of this hat is a bit high and I suggest weaving 3 or 4 rows for the crown rather than the 5 rows that I wove.
If you weave a hat like this, do send me some photos that I can add to this post. Everyone weaves differently and it’s great to share ideas.
© Ali Brown 2018.
Scroll down to leave a new comment or view recent comments.
Also, check out earlier comments received on this blog post when it was hosted on my original website.
Love your weaving and instructions very clear and simple. I so struggled with my brims Arohanui
Thanks Marie. Happy weaving!