31 May 2010
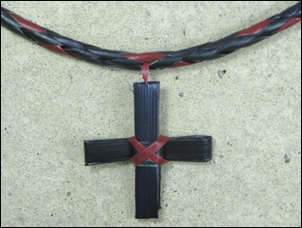 If you’ve mastered the rounded four-plait cord you may like to try plaiting a rounded cord with six strips. Plaited cords look good as a necklet or bracelet or they can be made into an original piece of jewellery with the addition of a pendant. I made the flax pendant illustrated here by adapting a pattern for an Easter palm cross.
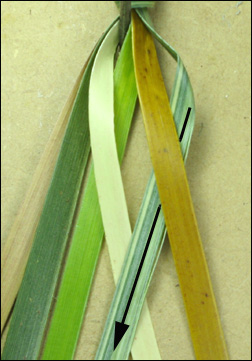
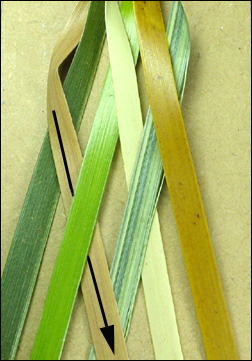
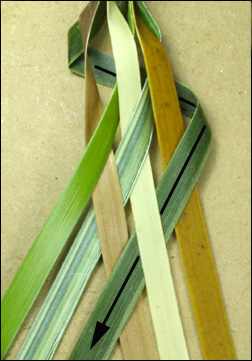
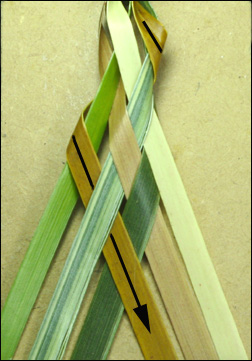
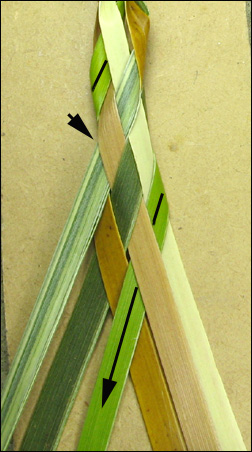
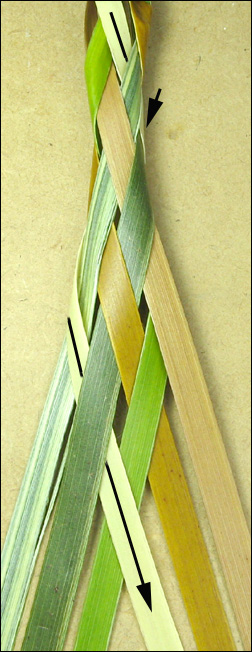
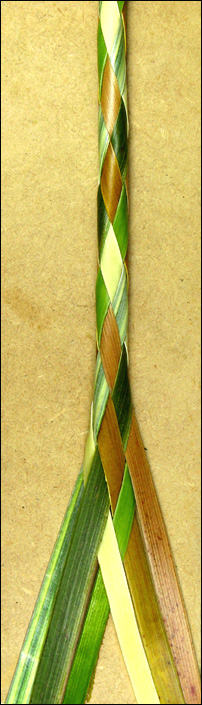
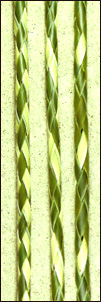 Using six strips opens up more possibilities for different patterns on the cord. The patterning on the cord will depend on which order the colours are hung together at the start and how many strips are used for each colour. The three patterns illustrated here are made as follows: the first sample is made using two green and one white strip on each side, (the white strips were the two strips in the middle), the second sample uses alternate green and white strips and the third one uses five green and one white strip. The same effect will be achieved no matter where the one different-coloured strip is put in the sequence in this pattern.
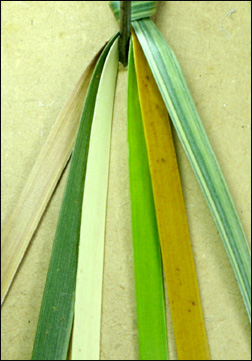 For the sample illustrations, I’ve used six different coloured flax strips to clearly show the plaiting of a rounded six-plait cord. The colours from left to right are pink, blue-green, white, lime-green, yellow and striped. A six-plait cord made from strips becomes rounded because the shiny side of each strip is kept to the outside of the cord all the time as you plait. Start with six flax strips all the same width.
 As for any cord, it’s easier to get an even plait if you have one end of the work held by a friend or you tie the end around a solid object such as a chair leg or a nail in a piece of wood. This means you can pull the strands towards you as you plait, so you can keep an even tension on the plaiting. Here I’ve used a nail banged into a piece of wood. Arrange the strips so that the shiny side of each strip is showing uppermost. Start by crossing the left middle white strip over the right middle lime-green strip.
 Now pick up the right-hand outside strip, the striped one, and keeping the shiny side of the flax showing, weave it across to the left and into the middle, going under the yellow strip that’s next to it, and over the next strip, which is the white one, so that it rests next to the other middle strip.
 Go to the left-hand side, and keeping the shiny side of the flax showing, weave the outside red strip, into the middle. To do this, take it to the right over the blue-green strip next to it, under the lime-green strip and then over the striped strip. This completes the starting sequence.
 The next sequence of movements are the ones that are repeated to make the six-plait cord. Go to the left-hand side and take the blue-green strip back behind all the other strips, and then bring it around and to the front, keeping the shiny side on the outside all the time. Now weave the strip into the middle of the strips. Do this by taking the blue-green strip over the yellow one, under the white one, and over the red one, so that it is now in the middle.
 Go to the right side and, keeping the shiny side on the outside, take the yellow strip behind all the others, and then bring it around to the front. Now weave it through to the middle of the strips. Do this by weaving it over the lime-green one, under the striped one and over the blue-green strip to the middle.
 Repeat the above two movements to continue the plait. Go to the left side and, keeping the shiny side to the outside, take the lime-green strip around the back and bring to around to the front. Now weave it through to the middle of the strips. Do this by weaving it over the white strip, under the red strip, and over the yellow strip to the middle.
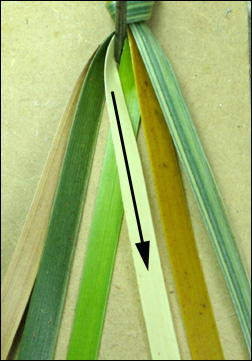
 Go to the right side and, keeping the shiny side to the top, take the white strip behind all the others and bring it around to the front. Now weave it through to the middle of the strips. Do this by taking it over the striped one, under the blue-green one and then over the lime-green strip to the middle. Repeat this sequence, remembering to alternate the sides that you pick up the strip to plait with. A way to make sure that you are choosing the right strip to start each plait with is to compare the outermost strips on each side. The strip that emerges from the side of the plait at the lowest point is the one to use. For example, in this photo here, it is the striped one on the left which is the one to plait with as it’s lower than the red one on the right.
 As you plait, pull the strips up tightly together so that the cord becomes rounded and tightly plaited. This roundedness is not apparent with the first two or three movements but does become clear soon enough. I made this cord with six differently-coloured strips to make it easier to follow the instructions, but, as the photos at the top of this post show, it’s fun to use this plait to make differently patterned cords. The cord is not as strong as others as it has a hollow core. A stronger cord can be made by doing this six-plait with shredded flax.
I found the instructions for the six-plait rounded cord in a leatherwork book written by Ron Edwards, the founder of the Australian Whipmakers and Plaiters Association. Ron wrote many books on leatherwork and some of the ideas and techniques are useable in flax weaving. You can find his books for sale at Rams Skull Press.
© Ali Brown 2010. Updated 2021
Scroll down to leave a new comment or view recent comments.
Also, check out earlier comments received on this blog post when it was hosted on my original website.